Zorin OS is a highly polished Ubuntu-based Linux distribution providing an excellent alternative to Windows and MacOS. It is a an operating system that is gaining popularity (distrowatch) for many reasons. One of those reasons is the ability to integrate your Android mobile device with Zorin OS by utilizing the built-in Zorin Connect.
Once your mobile device is paired with Zorin Connect via your local area network, the technology releases a number of features and benefits including:
The ability to share files and web links between devices
Send and receive SMS text messages from and to the desktop
View your mobile device’s notifications on your desktop, including incoming calls
Control slideshows and multimedia on your desktop from your mobile device
Issue commands on your mobile device to execute on Zorin
And there’s plenty more.
Zorin OS Firewall can prevent the pairing of your mobile device with Zorin Connect
Zorin Connect | Pair Devices
If Zorin Connect fails to detect your mobile device on your local area network, then follow these steps to create a rule in your firewall to enable communication between them.
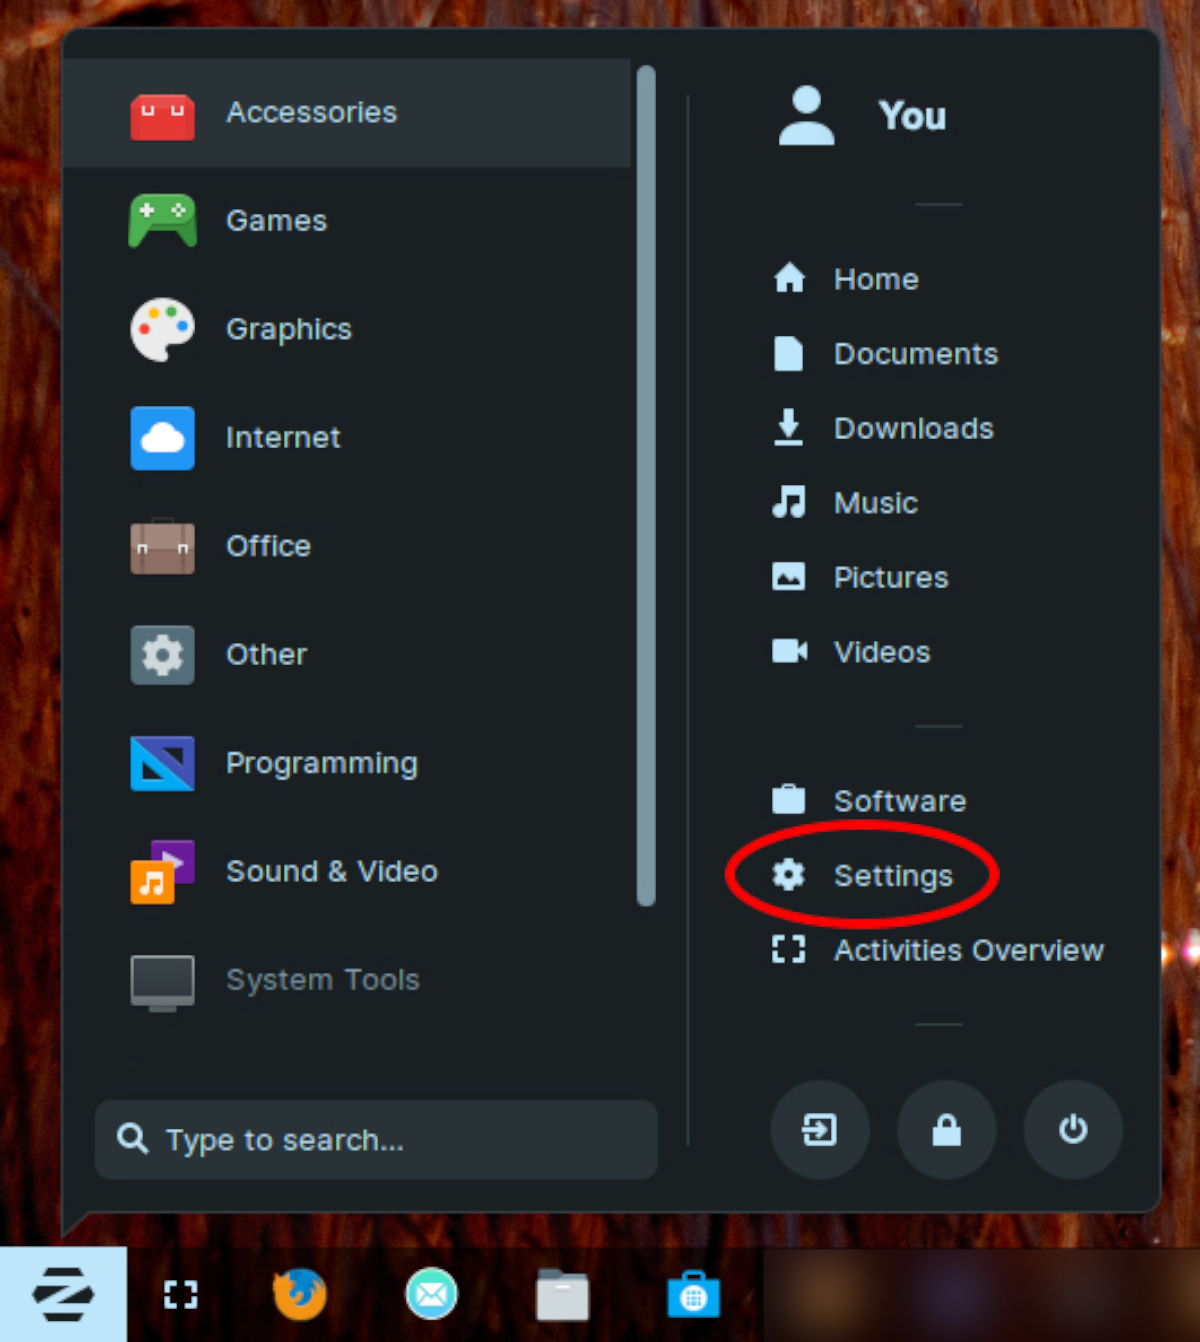
Step 1 – Open Zorin OS Settings
Zorin OS Settings
Click the Zorin ‘start’ button on your task bar and select Settings from the main menu.
Step 2 – Open Firewall Configuration
Zorin OS | Add Firewall Rule
In Settings, select Privacy and Firewall Configuration. You will then be prompted to authenticate yourself by entering your password.
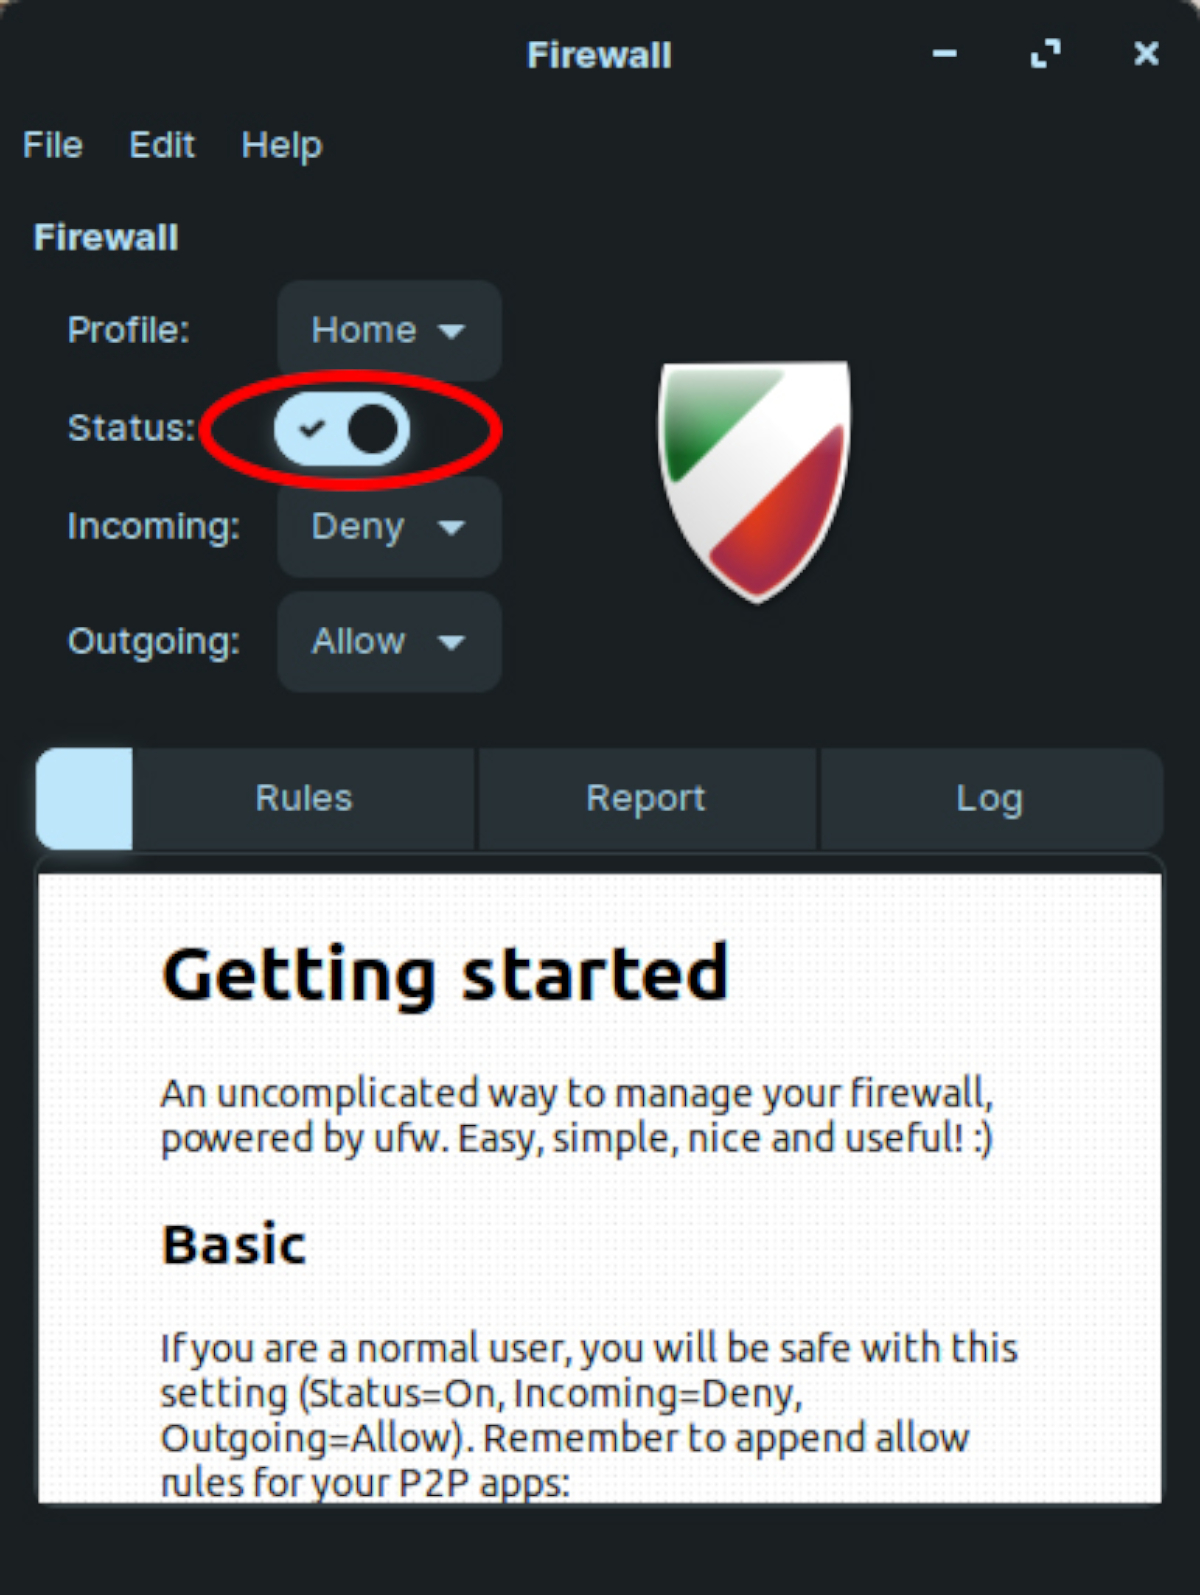
Step 3 – Check Firewall Status
Zorin OS | Firewall Status
At this point, you can opt to turn off the Zorin Firewall to see if Zorin Connect discovers your mobile device successfully.
Step 4 – Zorin Connect Protocols and Ports
At the time of writing, Zorin Connect communicates using the following protocols and ports:
IPv4 TCP 1716
IPv4 UDP 1716
IPV6 TCP 1739
To check this is still the case, hold down Ctrl + Alt + T at the same time to open a terminal window on your desktop. Highlight the command below then hold down Ctrl + C to copy it to the clipboard. Then, right-click and select Paste in the terminal window. Make sure that Zorin Connect is running when you do this.
sudo lsof -i -P -n | grep gjs
Zorin Connect | Protocols and Ports
The lsof command displays information about files that are opened by processes. grep filters the output list to show results for gjs, the process name for Zorin Connect.
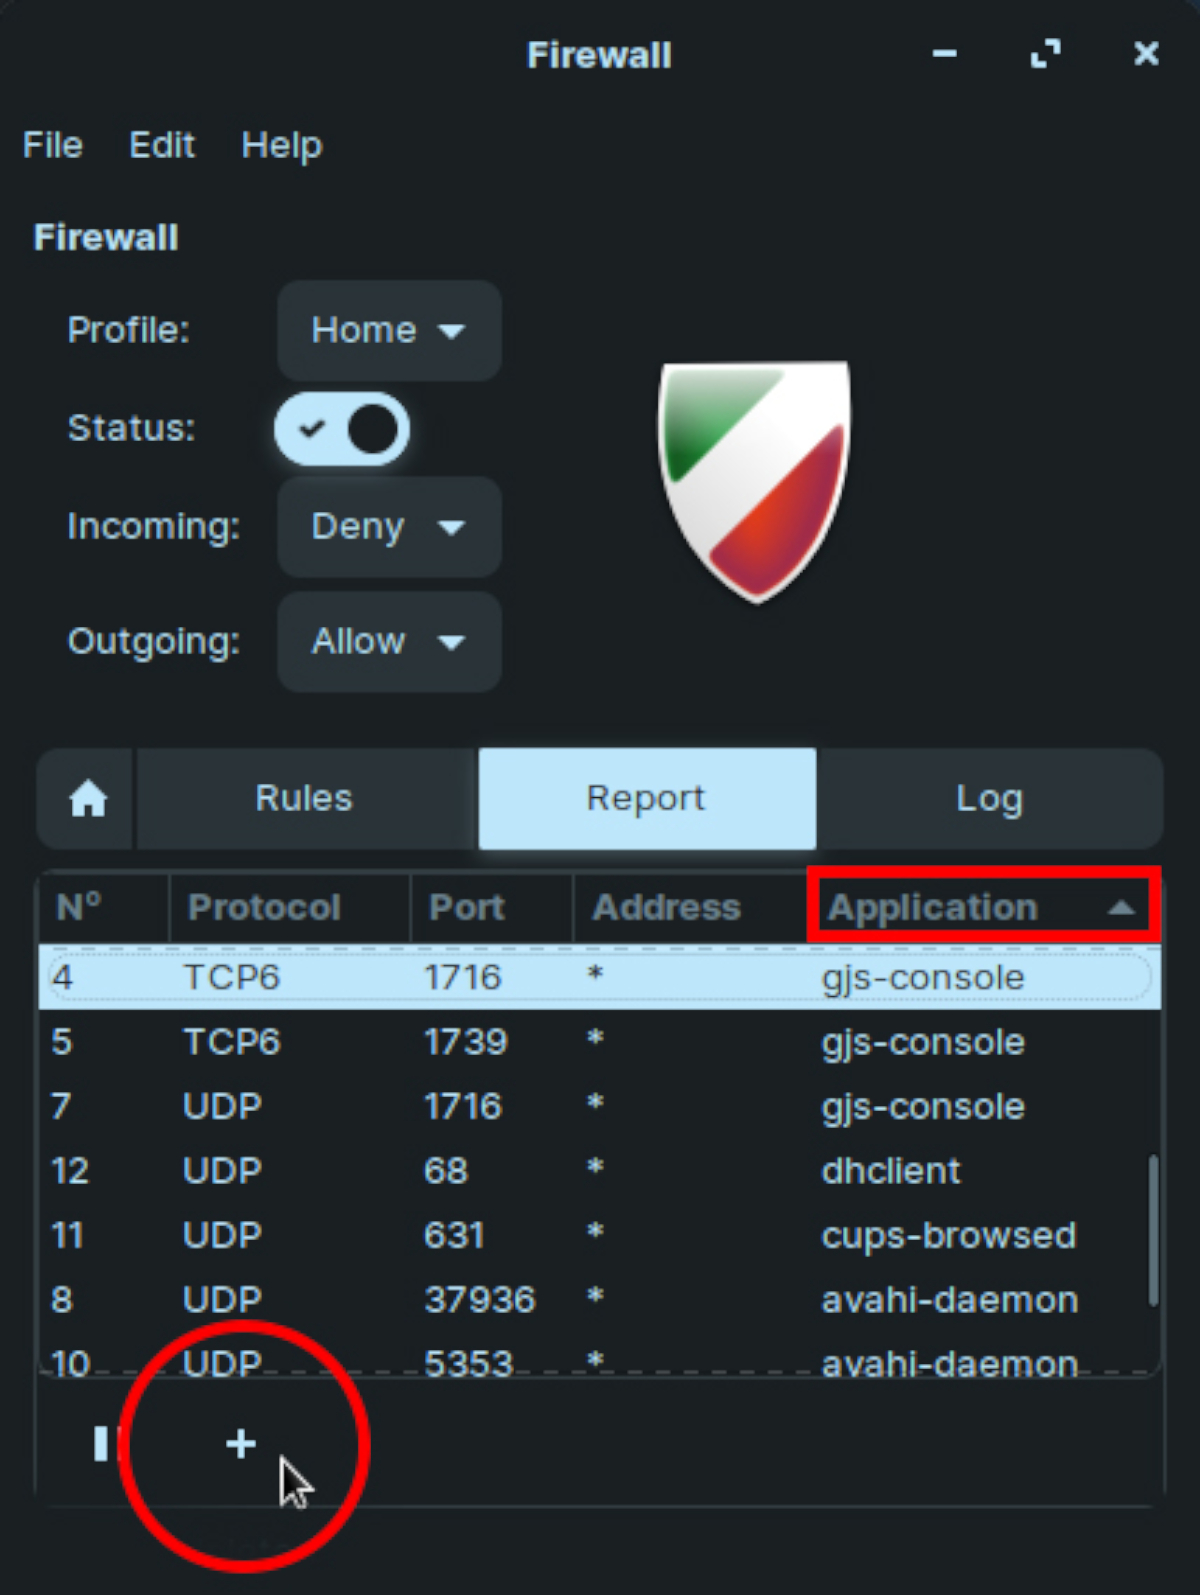
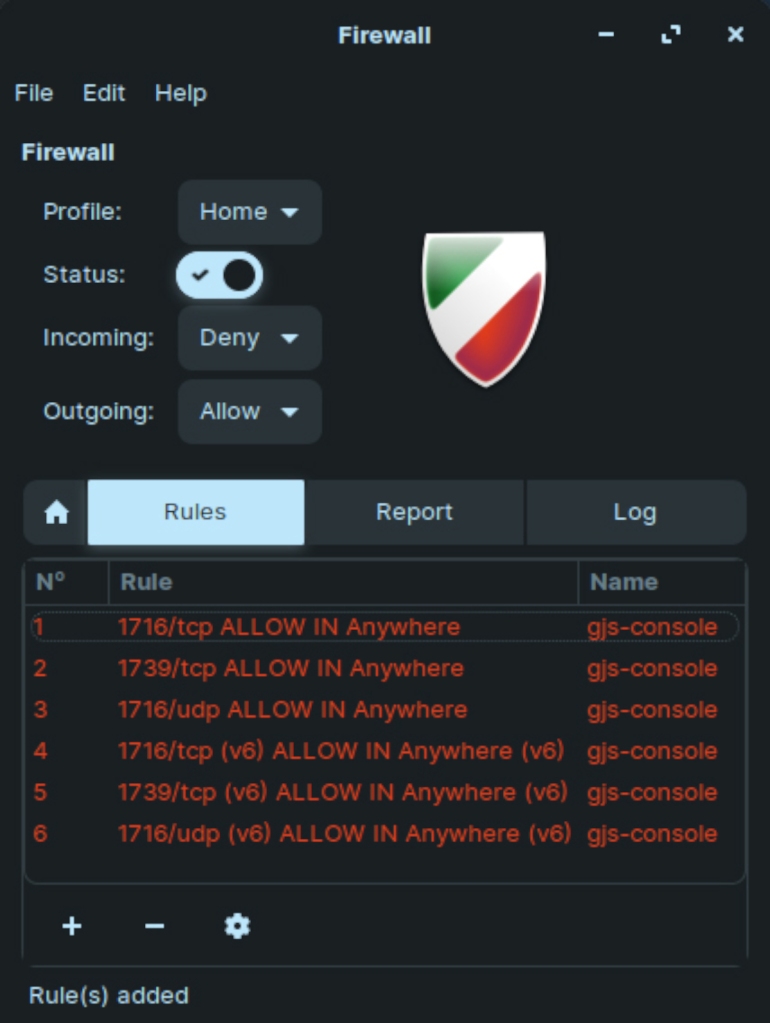
Step 5 – Create Firewall Rules
Zorin Firewall | Create Firewall Rules for Zorin Connect
Click the Report tab in the Firewall configuration window. Then, click the Application column header to group the instances of gjs-console together.
Select the top instance of gjs-console to prevent the list from jumping around. Then press the plus (+) symbol at the bottom of the window.
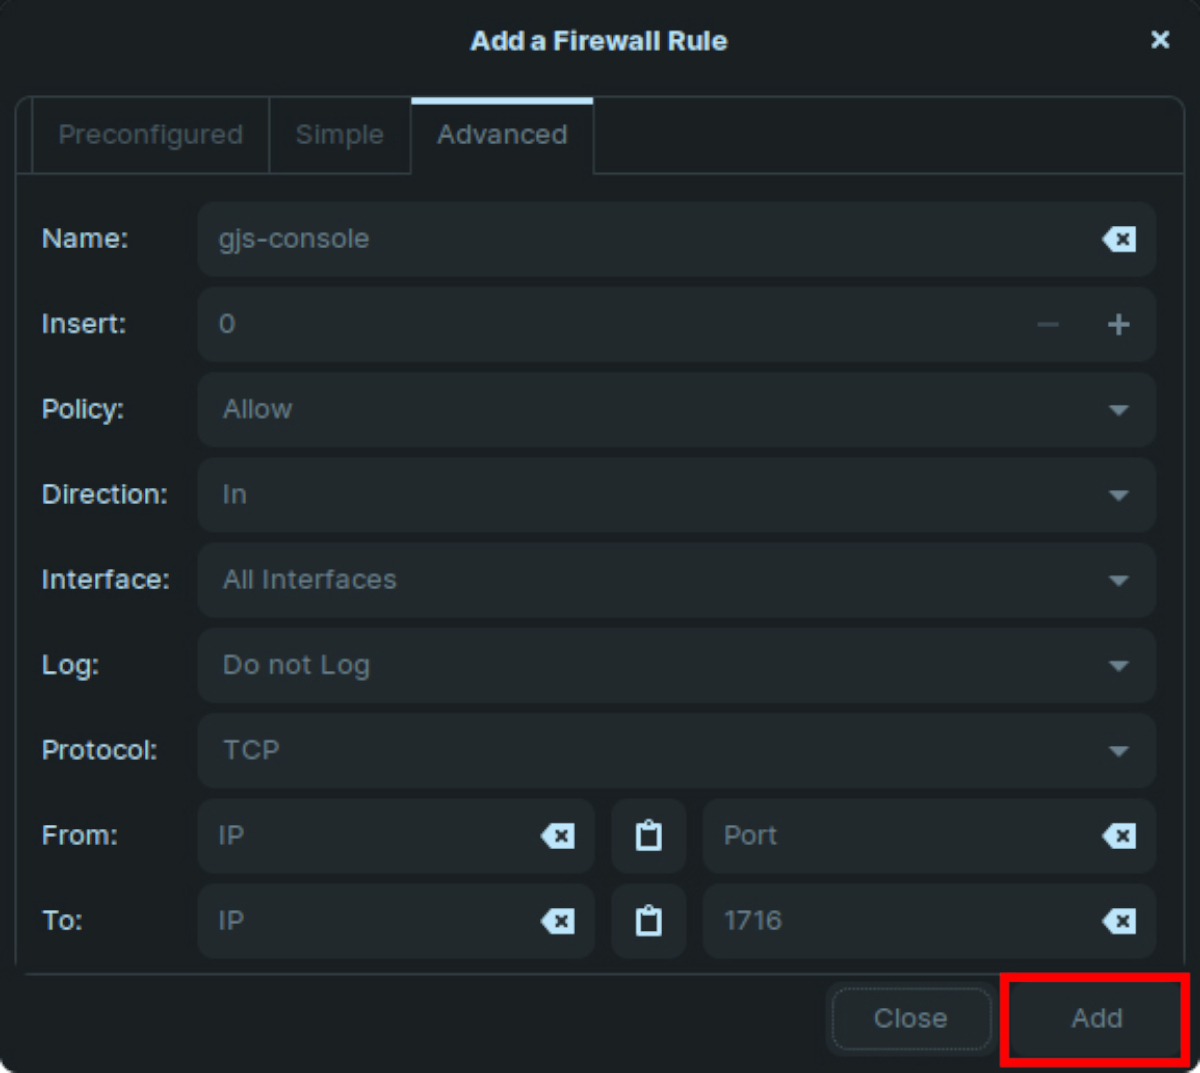
Zorin OS | Add Firewall Rule
A firewall rule will be created automatically. Make sure to click the Add button and then the Close button to return to the Firewall Report.
Add firewall rules for the remaining two instances of gjs-console.
Step 6 – Review Firewall Rules for Zorin Connect
Click the Rules tab in the Firewall configuration window to review the rules you have just set up for Zorin Connect.
How to backup Minecraft Worlds created on an Apple iOS device, to a PC and then restore them.
This article describes how to make a copy of your Minecraft Worlds created on Apple iOS mobile devices such as the ipad or iPhone, to a PC without using iTunes.
This is particularly useful if the Minecraft app becomes corrupt and you need to re-install it from the App Store. Before an app can be reinstalled on an iOS product, it has to be deleted first. The deletion process removes all associated data with that app, in this case your Minecraft Worlds. And, you don’t want to lose them, do you?
Attempting to make backups with iTunes is well documented on the internet but can lead to frustrating errors such as:
"games" could not be copied because an error occurred. A duplicate file name was specified.
The following method works flawlessly and will prevent loss of your Minecraft Worlds if you ever find it necessary to re-install Minecraft on your iPad or iPhone. There’s also no need to install iTunes on your PC.
What You Will Need
A PC running Windows. This computer will require a USB port.
The USB to iOS mobile device charging lead.
Syncios installed on your computer.
Syncios is a free, powerful and comprehensive tool to manage and transfer files between an iOS device and a PC/MAC.
Steps to Backup and Restore Your Minecraft Worlds with a PC in the Event of Minecraft Re-Installation on an iOS Device
Download and install the free version of Syncios to your computer.
Launch Syncios on your computer.
Connect your mobile iOS device to your computer with the charging lead and the computer’s USB port.
If this is the first time you have connected your device to your computer, your mobile iOS device will ask to trust the connection. Trust the computer.
Syncios will take a few moments to detect your iOS mobile device. And, when it does, it will display an overview of the detected device.
Dismiss the warning: Turn off iTunes and do not operate your mobile device directly when running Syncios.
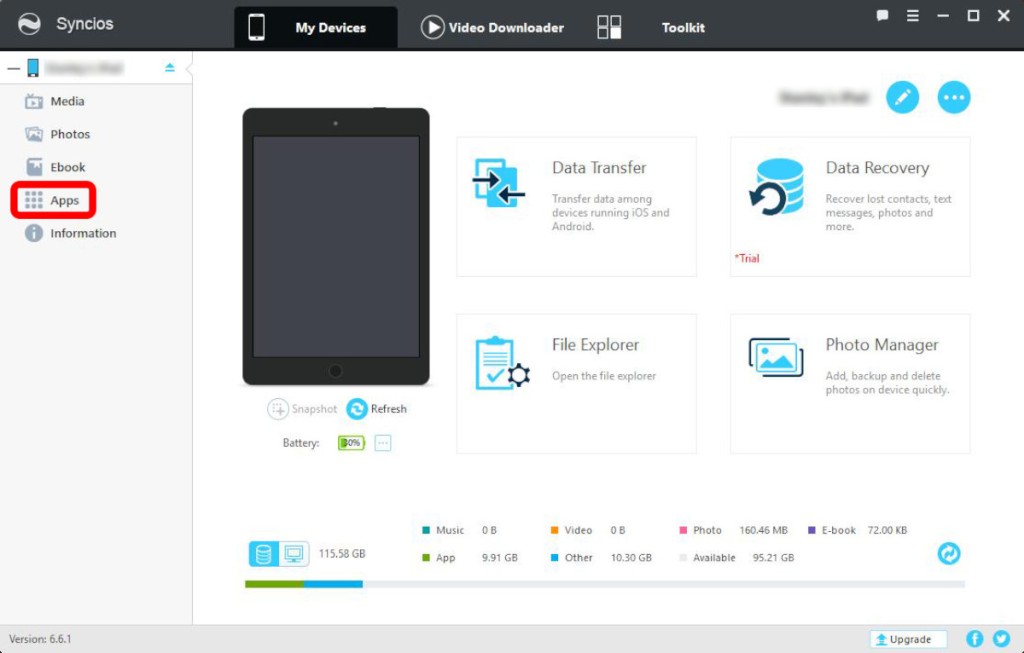
Select Apps from the left-side menu.
Syncios | My Devices
Scroll through your installed apps until you find Minecraft.
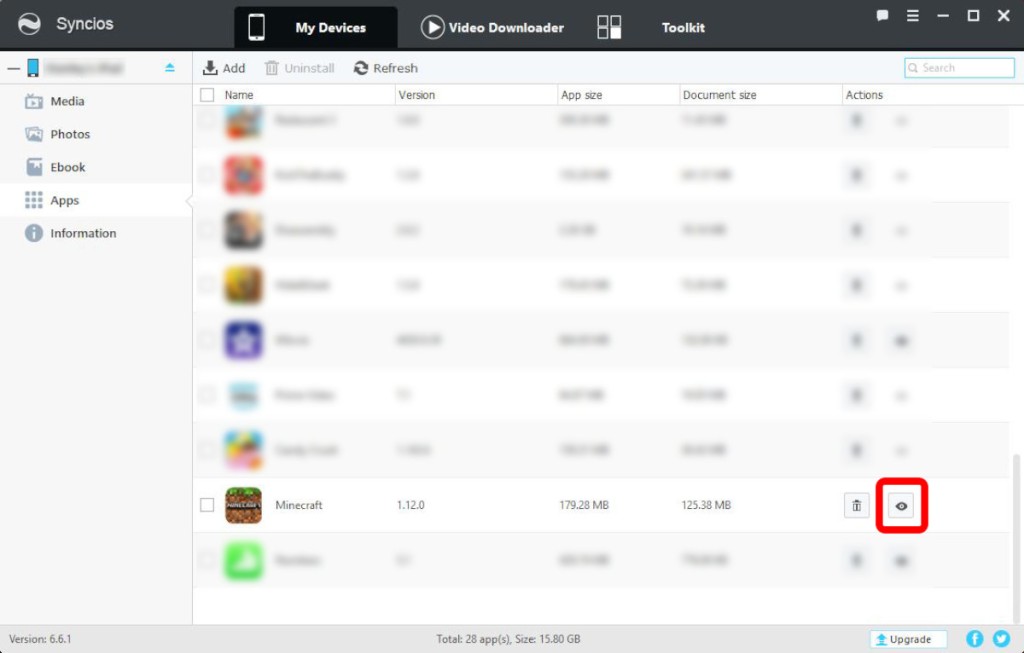
Under the
Actions column, click the ‘eye’ on the right-hand side of the trash can to open Minecraft’s app documents.
Syncios | Open the Minecraft App Documents Folder
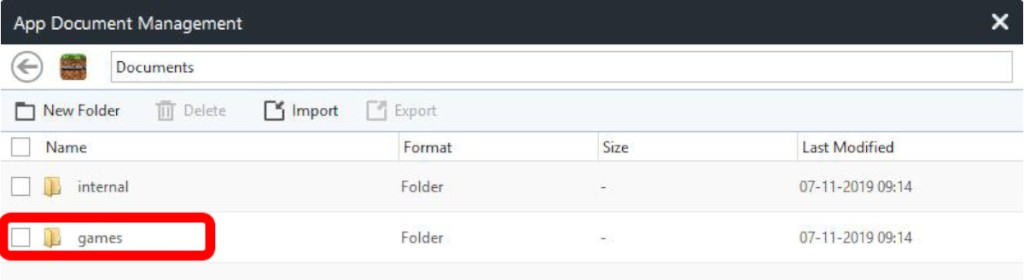
Double-click the games folder.
Syncios | Double-click the games Folder
Double-click the com.majong folder.
Syncios | Double-click com.mojang folder
Inside this folder is a folder called minecraftWorlds, which contains your saved game data. The contents of this folder can be copied to your computer in two ways: Either tick the box next to the folder name and then click Export OR drag and drop the folder from Syncios to an open folder on your desktop.
Syncios | Export minecraftWorlds to PC
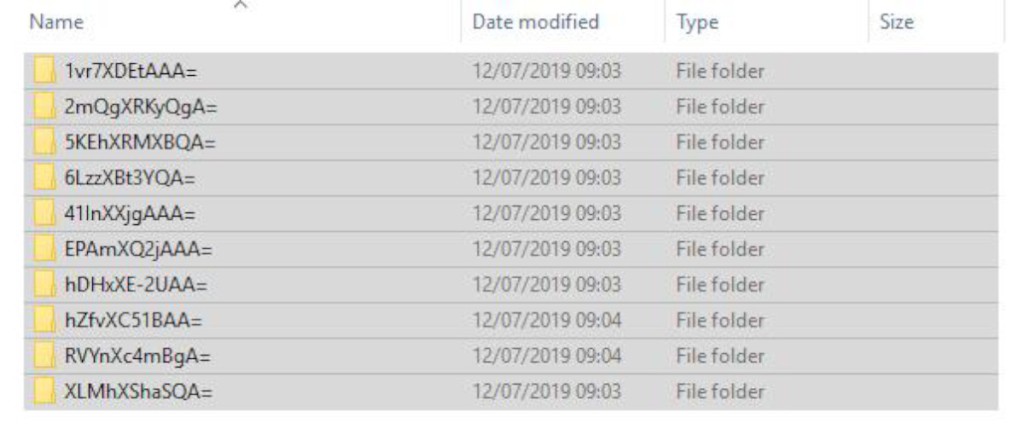
Check the content of your copied folder by exploring within on your PC. The Minecraft Worlds are each saved in separate folders named with unique random characters and ending with =
Minecraft Worlds contained in a Separate Folder
Disconnect your iOS mobile device from the computer.
Delete the Minecraft app from your mobile iOS device then re-install it from the Apple App Store (you won’t have to pay again).
Launch Minecraft on your mobile iOS device and create a new world. Then, exit the Minecraft app.
Re-connect your mobile iOS device to your computer and wait for Syncios to detect your device.
in Syncios, navigate to Apps, Minecraft, Documents/com.mojang/games/minecraftWorlds in the same manner as steps 7 to 11.
On your computer, enter the minecraftWorlds folder and select all folders by clicking the first folder, holding down the shift key and selecting the last folder.
PC | Select All Your Minecraft World Folders
Drag and drop all your selected folders to the Syncios folder panel to copy your Minecraft Worlds back to your iOS mobile device.
Syncios | Minecraft Folders Copied Back to iOS Mobile Device
Close Syncios and disconnect your iOS mobile device from your computer.
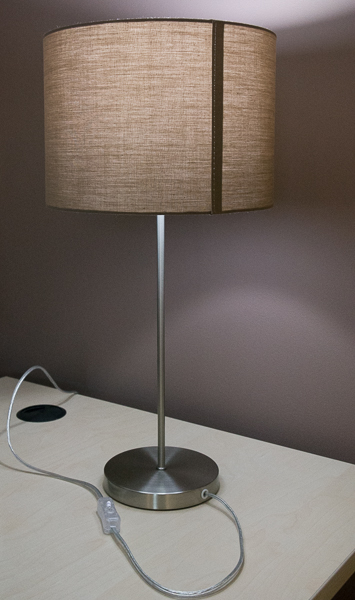
For the sake of clarity, this is a review of the Honsel Loft collection of lamps with the cappuccino fabric shade, purchased from Amazon with hard-earned cash.
Honsel Leuchten Loft Collection
This German-made Honsel Leuchten Loft collection consists of:-
The colour of the cappuccino fabric shade is consistent across all the Honsel Loft range. A point you may need to be assured of if you intend to purchase more than one lamp from this collection.
The cappuccino fabric shade is a composite of a rich brown woven textile on a white plastic light defuser. It looks good whether illuminated or not and will compliment any neutral colours in your room.
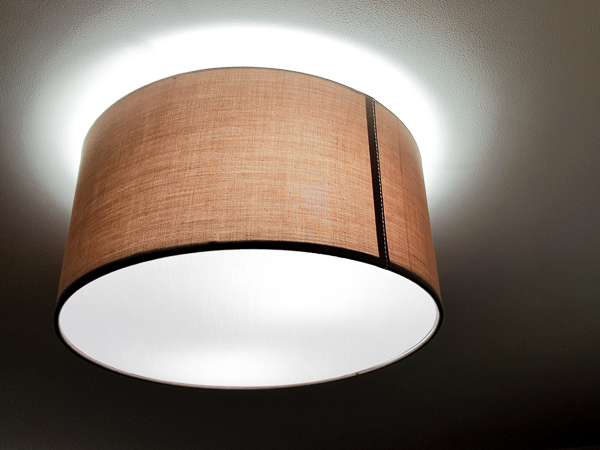
The two ends of the shade material are stitched together to form the shade’s circumference, resulting in a visible vertical seam on one side of the shade. The join is quite obvious when the lamp is lit and this might be a factor for consideration. However most lamps, such as the Table and Floor Lamps, are likely to be situated near a wall with the seam orientated out of sight. Potentially then, the seam might only be a problem in you intend to view this lamp from 360°. I own the semi-flush ceiling lamp which can be viewed from any angle and the seam does not bother me. In my opinion, it adds to the appeal of the shade.
Honsel Leuchten Loft semi-flush Ceiling Lamp
The shade defuses and absorbs light to a pleasant level (at a guess I’d say approximately 20% of the bulb output) yet allowing full light to be thrown both up and down from the lamp shades. The light cast in the locale is pleasing, emphasising the nickel finish of the base and stand of the lamps. The strength of down-light is more than ample for nearby reading or writing tasks. The whole effect is comforting in the evening.
Each lamp from the Honsel Loft collection is a well made, quality product and looks more expensive that it is to buy.
What to expect when you order from Amazon
Typically, Honsel Loft lamps are shipped from Germany, so even if you’re an Amazon Prime member, don’t expect next day delivery. However, as a Prime member, delivery will be expedited and the item will be rushed to you as fast as practically possible. All my items, which I ordered separately, arrived within a couple of days.
Detailed below is my experience of receiving both the Honsel Loft Table Lamp and Honsel Loft Floor Lamp.
Receipt of the Honsel Loft Table and Floor Lamps
These Honsel Lamps arrive extremely well packaged and require minimal assembly. The electric cable is already threaded through the base to the lamp holder. All that is required is to screw the stand into the weighted base, unwrap the well-protected fabric shade and fasten it to the lamp. Then screw in a bulb of your choice into the E27 cap. I opted for a Philips hue ambient and colour bulb in mine and they look gorgeous when illuminated in any colour and at any brightness!
Philips Hue White and Colour Ambience Personal Wireless Lighting 2 x 9.5 W E27 Edison Screw LED Twin Pack Light Bulbs
Lamp assembly is easy and just takes a few moments, although you may find that unwrapping the well-protected shade itself will take the longest time. The support for the floor lamp is made of two sections, which screw together seamlessly in a matter of seconds. This enables the tall floor lamp to arrive in a relatively small package.
I really like the choice of the semi-transparent electric cable and the integrated rocker on/off switch. The transparency allows both the cable and switch to blend in with its surroundings somewhat and are difficult to see from a distance if they happen to be on show. A neat feature in my opinion, and much better than having a high contrast black or white cable attached to the lamp. The rocker switch makes lamp operation simple and easy.
Honsel Loft Table Lamp | Transparent Power Cable and Rocker Switch
The cable is two core and terminates with a European 2-pin plug. If you don’t have any spare, you may need to factor in ordering some EU adapter plugs at the same time. Amazon class these as add-on items. They’re not expensive, but ordering them separately will incur delivery charges. Check prices.
UK Travel Converter Plug – Euro 2 Pin to UK 3 Pin Adapter
It is also worth noting at this point that this lamp is not earthed but is perfectly safe to use. Due to the lamp’s design and the careful consideration of materials used in its construction, the exposed parts of the lamp are either non conductive or insulated. For example, the base and stand are made from a tough plastic and coated with the ‘nickel’ silver finish in order for the lamp to appear to be metallic.
The lamp bases are weighted sufficiently to prevent the product from being knocked over from general bumps.
The Honsel Leuchten Loft semi-flush ceiling lamp is a beautiful modern shade that is easy to install. A quality, white-enameled lamp screws into the ceiling, to which the lamp shade is attached. The shade is completed with a white diffuser, resulting is a very pleasing finish indeed.
Instructions on how to insert the diffuser into the shade are provided. This is a tricky operation that can be accomplished easier with help from another person.
The lamp has two E27 caps and again, looks great when fitted with the Philips Hue colour and ambient bulbs.
Philips Hue White Ambience Twin pack A19 E27 60W Equivalent Dimmable LED Smart Bulbs
Advertised as semi-flush, the lamp shade of the Honsel Leuchten Loft 20462 sits approximately 25mm (1″) away from the ceiling. This creates a beautiful aurora between shade and ceiling when the lamp is illuminated. The lamp holder cannot be seen from ground level.
Affordable, quality made lamps and shades that look more expensive than they actually are to buy.
The cappucino lamp shade will compliment any neutral colours in your home and introduces a modern look.
The shade is a composite of a rich woven fabric and a white plastic diffuser. The shade colour is consistent across the range.
The shade has a visible seam which may be a factor for consideration if viewing from all around.
Transparent power cable and rocker switch for the Table and Floor Lamps allows the lead to blend into its surroundings.
All lamps are mounted with E27 screw caps. Philips Hue bulbs fit.
Honsel Table and Floor Lamps are easy to assemble. The semi-flush ceiling light is easy to fit too. Adding the diffuser to the shade is the most trickiest part of assembly. Enlist help.
Expedited deliver via Amazon. Well packaged goods.
Table and floor lamps are supplied with a European 2-pin plug. Remember to factor in EU adapter plugs if you live in the UK.
cdkeys.com | Build your game collection the easy way and at knock-down prices
There’s an age-old saying that if something sounds too good to be true, then it probably is.
This is not the case though with cdkeys.com, specialist providers of digital download codes for PC games on Steam, Origin, and UPlay – and all at seriously discounted prices.
I’ve made regular purchases from cdkeys.com and have built up a substantial PC game collection for very little cost. I cannot fault their service and competitive pricing.
Purchasing is fast and easy and your digital download code is sent to you via email once the transaction is complete. Highly recommended.
cdkeys.com
Here’s a breakdown of all their excellent deals:-
Digital download codes available at cdkeys.com for the PC
Spam text messages without number | How to block messages without number | How to block sms without number | Spam text with no number | How to block sms without number in Samsung | sms no number | How to block spam sms with a name not number
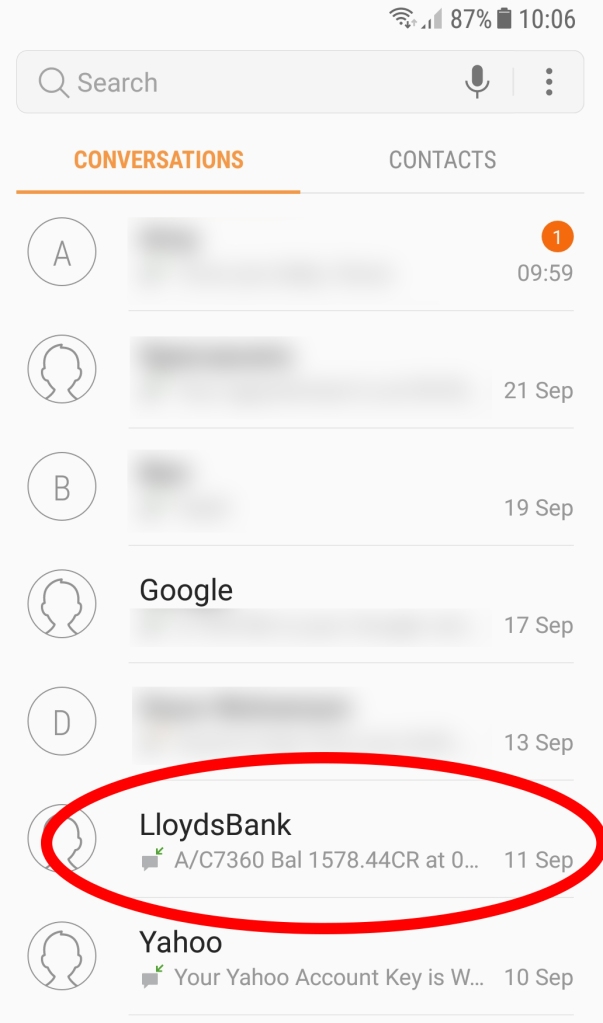
This article describes how to ‘block’ spam SMS text messages that have a name instead of a number and is specific to smartphones that use the Android operating system.
Without installing any third-party apps, this guide shows the steps taken on a Samsung S8 smartphone to ‘block’ spam SMS messages that have no number, by constructing a filter to identify and capture them.
Smartphones that run on an Android operating system are capable of diverting spam SMS text messages to a spam folder, even if the telephone number is absent from the message or the telephone number has been replaced with a name. Although these messages are still received by your handset, the method of identifying and diverting spam in this way creates the illusion that the nuisance message has indeed been blocked.
To ‘block’ spam SMS text messages that have a name instead of a number, follow these simple steps:-
STEP 1: Open the Samsung Messages app.
Samsung S8 Messages App
STEP 2: Identify the spam SMS text message and tap it.
Identify Spam SMS
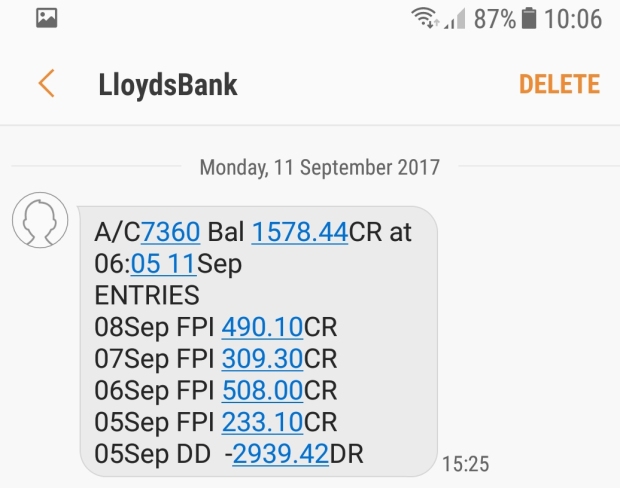
STEP 3: Take note of the keywords or phrases that are in every message received.
SPAM SMS Message – Note the Keywords
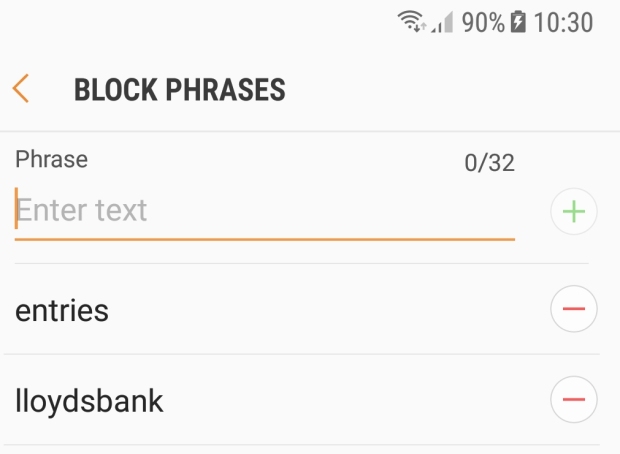
In this example, I use the name of the sender, LloydsBank and the word ENTRIES.
STEP 4: Go back to your list of messages by pressing the back arrow, top left.
STEP 5: Open message options by tapping the three dots at the top right of the screen
Message Options
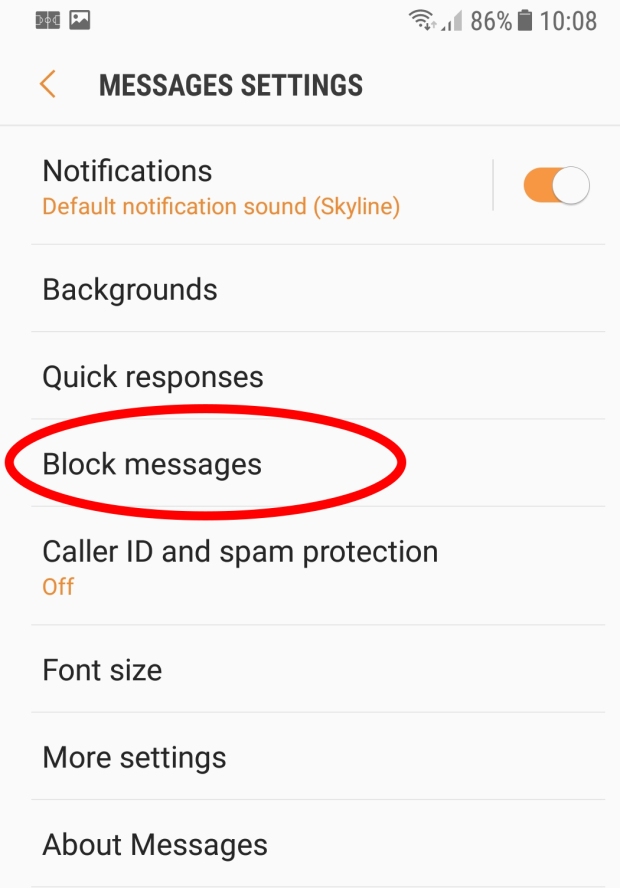
STEP 6: From the options that appear, tap Settings.
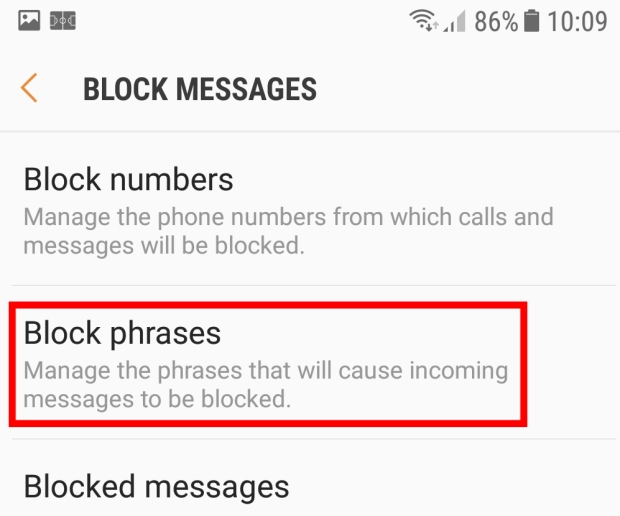
STEP 7: Tap Block messages
Block messages
STEP 8: Tap Block phrases – Manage the phrases that will cause incoming messages to be blocked.
Block phrases
STEP 9: Enter the keywords or phrases noted in step 3.
Block keywords and phrases
Type a keyword or phrase then tap the plus (+) symbol to add it to the list. Remove a keyword or phrase by tapping the minus (-) symbol associated with that text.
As soon as a keyword or phrase is entered, then any new SMS message that contains that text will be diverted to the Blocked messages folder and effectively ‘blocked’.
It is important to note that:-
phrase matching is not case sensitive and all text entries are stored in lower case.
if a genuine SMS text message contains one of your chosen keywords or phrases, then that message will be ‘blocked’ too. It is therefore important to choose your keywords and phrases carefully.
STEP 10: You’re done!
Return to the Messages main list by tapping the back arrows on each of the option screens.
How to check Blocked messages
Once you have your keywords and phrases in place, it is worth checking your spam SMS folder occasionally to check its effectiveness.
Blocked messages
The Blocked messages list can be accessed from the Messages main conversation screen by tapping the three dots, top right, and selecting:-
A Review of the RAVPower EN-EL15 2100mAh Rechargeable Camera Battery and Charger Set for Nikon (Model: RP_PB057).
A versatile, affordable, and necessary aftermarket accessory for your Nikon camera.
For the sake of clarity, this is an independent review of the RAVPower 2100mAh rechargeable camera batteries and charger set (model: RP-PB057), intended for a variety of Nikon cameras including the Nikon 1 V1, D600, D610, D750, D800, D800a, D800e, D810, D7000, D7100 and D7200.
The product reviewed in this article was purchased from Amazon with hard-earned cash and the batteries tested extensively in a Nikon D7200.
Check the link below to obtain the latest price of this RAVPower charger set.
Good to know: This battery and recharger set comes complete with a free 12 months extended warranty when you register your purchase online.
REVIEW: RAVPower RP-PB057 Battery and Charger Set for Nikon Cameras
Product Description
RAVPower RP-PB057 Rechargeable Battery and Charger Kit
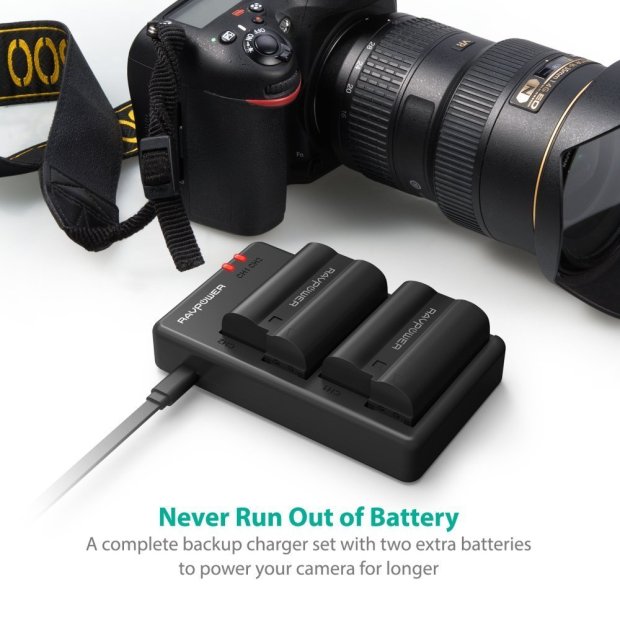
The RAVPower EN-EL15 2100mAh rechargeable camera battery and charger set is an affordable aftermarket camera accessory that offers a tonne of features and benefits over the Nikon MH-25 battery charger.
This RAVPower battery and charger set aims to provide a complete backup power solution for your camera. With an extra two replacement batteries and a dual charger to keep empty batteries charging on the go, you will always be prepared for those unexpected moments when your camera battery runs out of juice.
With this kit, you will have the potential to triple your camera’s run time with the two extra batteries alone. And, with the charger being able to connect to any micro-USB power source, this makes charging extremely versatile, as batteries could even be charged in remote locations with a portable battery, such as the RAVPower 26800mAh Power Bank.
Good to know: This power bank is capable of recharging one EN-EL15 2100mAh battery approximately 12 times from a full charge.
Package Contents:
2 x Replacement Batteries for Nikon EN-EL15 2100mAh
1 x DC Dual Battery Charger
1 x micro-USB Cable
Warranty Card
Package Contents | RAVPower RP-PB057 Rechargeable Battery and Charger Kit
EN-EL15 RAVPower 2100mAh Rechargeable Camera Battery and Charger Set for Nikon (2x Replacement Batteries, 2.1A USB Input, 100% Compatible with Original) – Black
Batteries:
RAVPower claim that their replacement batteries (RP-PB057 Savior Series) are made to the exact specifications of the Nikon EN-EL15 battery but with a slightly larger capacity of 2100mAh/14.7W compared with the 1900mAh/14W of the Nikon EN-EL15. This equates to a 10.5% increase in battery capacity over the original.
RAVPower RP-PB057 SAVIOR Series Nikon EN-El15 Battery Pack V Nikon EN-EL15 Battery
In my own tests, where I used these batteries continuously for 3 days in a Nikon D7200, I found no discernible difference in battery performance when compared with the original Nikon EN-EL15 battery. The RAVPower batteries charged just as quickly as the Nikon original; shooting duration and number of shots obtained were also on par with the Nikon.
RAVPower RP-PB057 batteries will charge inside camera if your camera model supports this feature. However, note that some models, like the Nikon D7200 do not support inside camera charging.
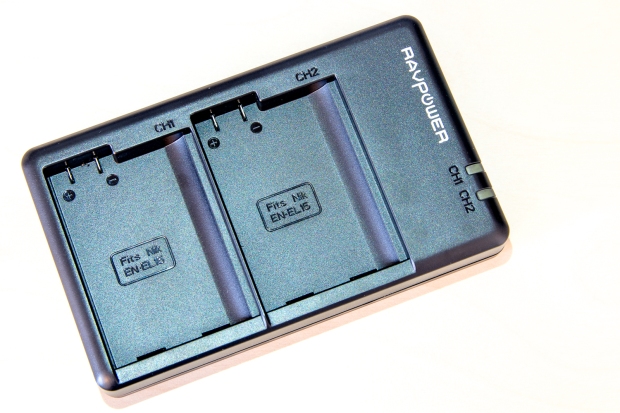
Charger:
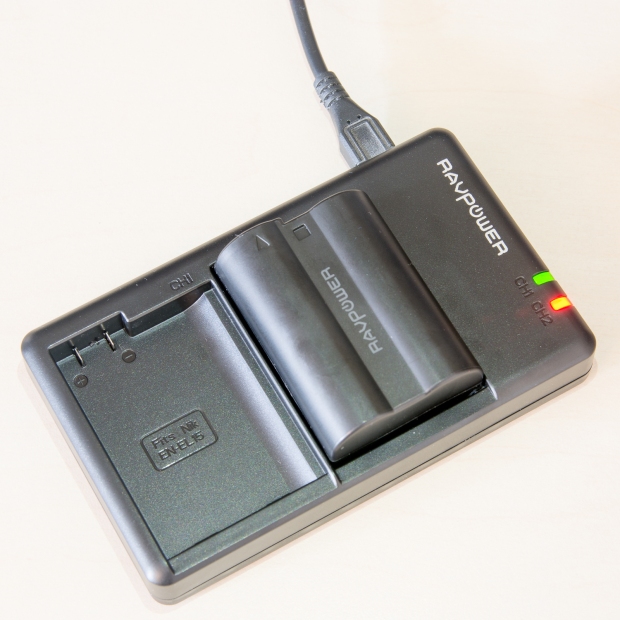
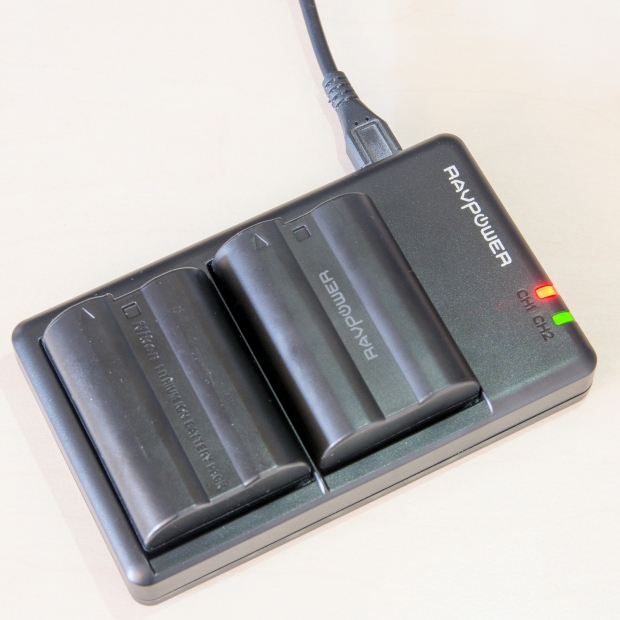
The RAVPower battery charger is light weight, but well made from a relatively strong, fire resistant plastic. It features two battery compartments and a pair of LEDs labelled CH1 and CH2.
RAVPower Charger for EN-EL15 Batteries
The LEDs indicate charging status and glow red when a battery is charging. The LEDs glow green when a battery if fully charged or when a battery bay is empty.
CH1 No Battery (Green) | CH2 Battery Charging (Red)
The RAVPower charger is capable of charging the original Nikon EN-EL15 battery alongside a RAVPower equivalent.
The RAVPower battery charger needs to be connected to a power source via the USB to micro USB cable provided.
RAVPower recommend that you connect to a charger capable of delivering at least 2.1 Amps to maximise charging efficiency. However, connecting to any USB power source will still charge the batteries. It will just take longer.
Good to know: A power adapter for the Raspberry Pi 3 is an ideal companion for this battery charger as they are rated at 2.5 Amps minimum.
A Recommended Buy
The RAVPower 2100mAh rechargeable camera batteries and charger set (model: RP-PB057) is an affordable, quality made, aftermarket accessory for your Nikon camera. It is less expensive than the Nikon MH-25 charger; portable and offers a wealth of charging versatility with the two replacement batteries and the USB charging station.
With no detectable difference in battery performance from the original EN-EL15 Nikon battery, this kit represents excellent value for money and provides a total power solution for your camera.
Often promoted on Amazon with a substantial price discount, you should grab one of these today. Check the link below to obtain the latest price.
Buy the RAVPower 2100mAh Rechargeable Camera Battery and Charger Set for Nikon
ZD V Full Vibration Feedback 2.4GHz Wireless Controller Gamepad Joystick for PC (Windows XP/7/8/8.1/10), the PlayStation 3, Android devices and Steam.
For the sake of clarity, this is a review of the ZD V Full Vibration Feedback 2.4GHz Wireless Controller Gamepad Joystick for PC (Windows XP/7/8/8.1/10), the PlayStation 3, Android devices and Steam. It was purchased with hard-earned cash, so this review reflects that in terms of value for money.
The controller was purchased to compliment a RetroPie set-up and for occasional use with games on Steam.
The ZD V Full Vibration Feedback 2.4GHz Wireless Controller Gamepad Joystick is designed and manufactured by Dongguan Zhi Dong Electronic Technology Co. Ltd. in China. They are Amazon Marketplace Sellers and offer an incredible piece of gaming hardware for the money. A wired version of this model is also available with the same features as the wireless one. Both controllers are Plug and Play and PC fully compatible. They both contain a 360 core, which means that they are recognized as XBOX 360 controllers.
ZD V Full Vibration Feedback WIRELESS Controller Gamepad Joystick
ZD V Full Vibration Feedback WIRED Controller Gamepad Joystick
Packaging
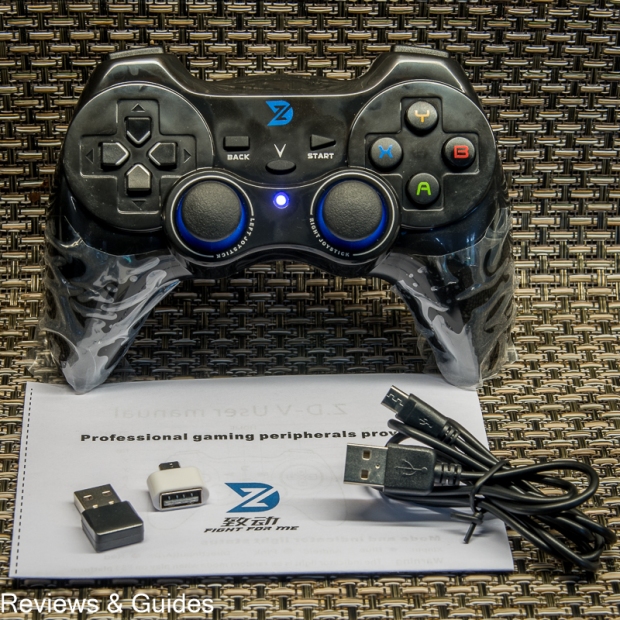
The ZD V Full Feedback wireless controller arrives quickly and is packaged in a brown cardboard box when ordered from Amazon. Inside is the blue cardboard box that houses the wireless controller and its accessories.
Packaging: ZD V Full Vibration Feedback Wireless Controller Gamepad Joystick
Two polystyrene inserts protect the ZD V wireless controller during shipping. You will find the controller in a plastic bag (not shown) for additional protection. The palm grips of the controller are protected further with easy-to-remove plastic film.
Inside the Box: ZD V Full Vibration Feedback Wireless Controller Gamepad Joystick
Inside the box are the ZD V Full Vibration Feedback 2.4 GHz Wireless Controller GamePad Joystick itself and a second bag containing a 2.4GHz USB dongle; a USB to micro USB cable; a USB to micro USB adapter to enable connection to Android devices, and a folded piece of paper containing the operating instructions, product specifications and manufacturer details.
Contents: ZD V Full Vibration Feedback Wireless Controller Gamepad Joystick
ZD V Full Vibration Feedback Wireless Controller Gamepad Joystick
Features & Operation
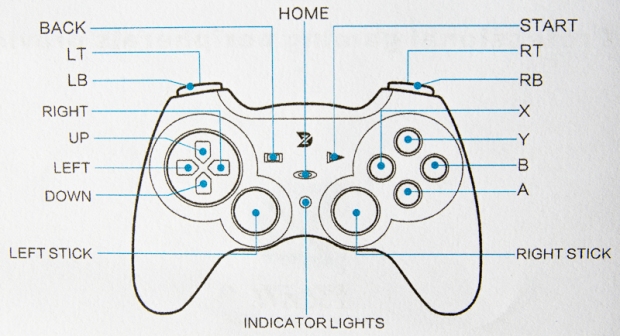
The ZD V Full Vibration Feedback 2.4GHz Wireless Controller Gamepad Joystick is equipped with the following buttons, triggers and joysticks:
Controls: ZD V Full Vibration Feedback Wireless Controller Gamepad Joystick
Both the LEFT STICK and RIGHT STICK are stick buttons and can therefore be clicked: LSB and RSB.
The trigger buttons [LT & RT] feel like single click buttons. They are, in fact, pressure sensitive buttons that provide linear graduation through pressure sensing. This means that the harder you press them, the greater the input value sent to your game. This feature means that the gamepad can be used in conjunction with racing games that require progressive braking and acceleration, or shooting games, where a one click shot is all that is needed.
Shoulder and Trigger Buttons – ZD V Full Vibration Feedback Wireless Controller Gamepad Joystick
Integral Rechargeable Battery
A micro USB port, located in between the shoulder and trigger buttons, is used to charge the on-board lithium battery and connect the controller to an Android device. The battery can be charged by connecting the device to a suitable 5 volt power supply via the supplied USB cable. A computer USB port or mobile phone charger will suffice. A charging unit is not supplied with the product, presumably to keep the cost of the units low.
The ZD V Full Vibration Feedback 2.4 GHz Wireless Controller GamePad Joystick is shipped with the battery partially charged. The temptation is to start using the game controller straight out of the box without fully charging the battery. I encountered numerous problems when I did just this, problems that disappeared when the device was fully charged later.
Since the lithium battery is integral with the controller, this means that it cannot be changed easily.
Important points for consideration are these:-
If the battery runs flat during a gaming session, the battery cannot be replaced. Instead, you would have to connect the controller to a charger, which means that you are now tethered to your charger until the battery has sufficient juice for you to remove it.
Lithium batteries have a finite lifespan due to the repetitive cycle of power depletion and recharging. When the battery begins to fail to hold charge for a decent period of time, then changing it may be difficult and expensive.
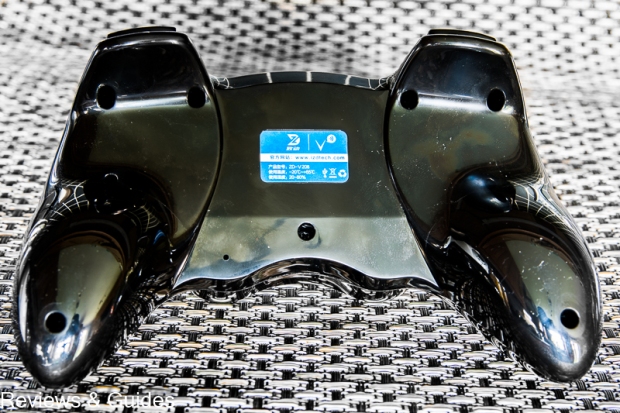
Rear View: ZD V Full Vibration Feedback Wireless Controller Gamepad Joystick
After a full charge, the ZD V Full Vibration Feedback 2.4 GHz Wireless Controller GamePad Joystick battery power lasts for a considerable amount of time. On a full charge, the battery lasts between 8 and 15 hours of continuous game play. These figures are in line with the published specifications.
Connection
Connection to gaming hardware if relatively simple. Just insert the wireless USB dongle into a USB port of your gaming equipment and select the operation mode of the gamepad with the HOME button.
How to Turn the ZD V Full Vibration Feedback 2.4GHz Wireless Controller Gamepad Joystick ON and OFF
TURN ON: Press the HOME button.
TURN OFF: Long press the BACK & B buttons together. Alternatively, the gamepad will automatically turn off after a reasonable time of inactivity.
Mode and Indicator Light Status
Press the HOME button to cycle through the input modes compatible with your device. The colour of the indicator light specifies what mode the gamepad is in.
The indicator light will flash until it detects a suitable driver on your gaming system. The indicator light will then shine constantly. Modes can be forced by long holding the HOME button.
Input Modes: ZD V Full Vibration Feedback Wireless Controller Gamepad Joystick
Use the XInput mode to enable the full vibration feedback feature. It is recommended for PC / XBOX360 games that have been written to provide vibration feedback.
Use the Direct Input mode for the PS3 and other platforms like the Raspberry Pi.
Use the Android mode when paired with an Android device.
Note: the full vibration feature will only work in XInput mode AND when the games have been written to support it.
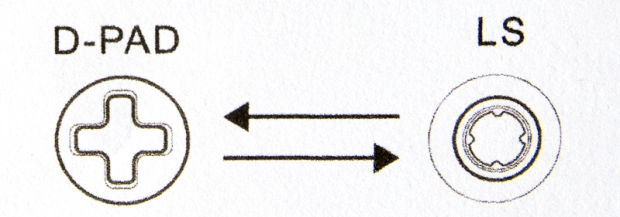
Exchange D-PAD and LEFT STICK Functions
A great feature of this gamepad is that the D-PAD and LEFT STICK controls can be swapped easily, back and forth, by pressing BACK and the LEFT STICK BUTTON at the same time.
D-PAD LEFT STICK Exchange: ZD V Full Vibration Feedback Wireless Controller Gamepad Joystick
If you want to use the ZD V Full Vibration Feedback 2.4GHz Wireless Controller Gamepad Joystick with RetroPie on the Raspberry Pi, then this function is fantastic for choosing the optimal left thumb controller for a particular ROM, quickly.
Conclusion
The ZD V Full Vibration Feedback 2.4 GHz Wireless Controller GamePad Joystick is rich with useful features that make it a versatile gaming accessory. With its 360 core and its range of compatibility modes, it can be used in conjunction with many gaming platforms. And, being a wireless controller means that you will not be tethered to your gaming hardware and restricted in range as you would be with its wired counterpart.
This gamepad feels good in the hands of both adults and children. It has been designed and produced to a quality resembling that of a PS3 controller. The construction is good; the buttons respond well and the joysticks work with precision.
Positives:
A versatile wireless controller with a XBOX 360 core, resulting in cross-platform compatibility. Fully compatible with PC, PS3, Android and other devices using Direct Mode.
Full vibration feedback when used in conjunction with compatible games.
Integral battery with continuous play time of 8 to 15 hours.
JD-Switch: The ability to swap the D-PAD and LS controllers in-game.
LT & RT are pressure sensing switches. This means linear and precise control in racing games is possible, depending on how you press.
Very good build quality, resembling that of a PS3 controller.
Negatives:
The controller is made from black glossy plastic, which attracts fingerprints. Very easy to wipe clean though.
This guide describes the steps taken to set up the free OpenVPN service on Linux Mint and create a toggle switch in the Network Connections applet to simplify its use.
A VPN connection toggle switch circumvents the need to launch the OpenVPN service by typing a command in a terminal window. Additionally, multiple VPN networks can be added to the Network Connection applet as desired, to manage all your VPN networks effectively.
Linux Mint VPN Network Connection using the free OpenVPN service
In brief, the steps required are:
Visit vpnbook.com and download the free OpenVPN Certificate Bundles to your computer.
Install the OpenVPN network daemon, network management framework and OpenVPN plugin core using Software Manager.
Create a VPN network connection using one of the downloaded OpenVPN Certificates.
1. Download the free OpenVPN Certificate Bundles to your computer.
Free OpenVPN is the best and most recommended open-source VPN software world-wide.
Visit vpnbook.com/freevpn and download one or more Certificate Bundles appropriate for your needs.
Also, make a note of the Username and Password that are displayed beneath the list of certificates.
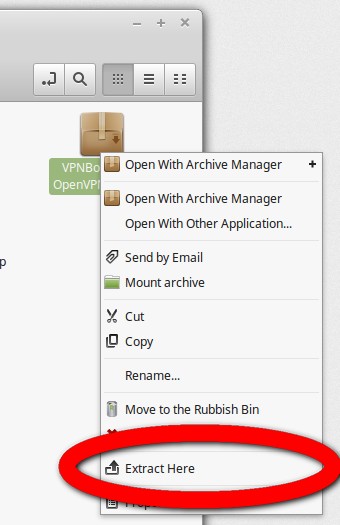
The Certificate Bundles are provided in a compressed file and need to be extracted. Go to your download folder and right-click the downloaded zip file. Select Extract Here to unzip the files quickly inside your download folder.
Right-click and select Extract Here
At this point, you may want to create a dedicated certificate folder in which to store all your extracted certificates.
2. Install the OpenVPN software.
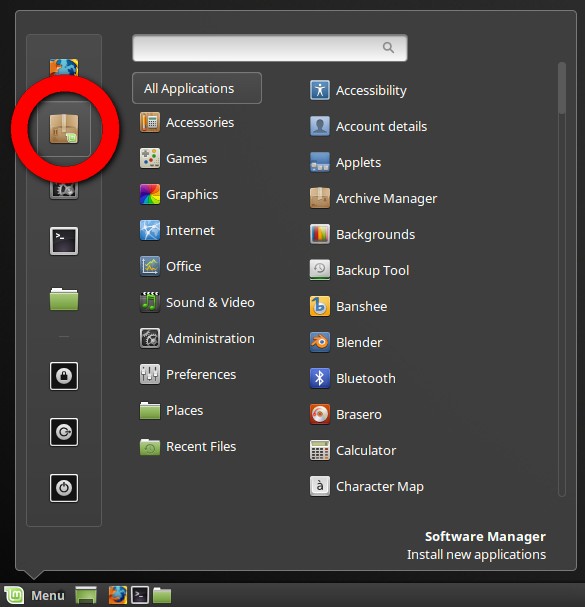
Launch Linux Mint Software Manager from the Menu and enter your password when prompted.
Select Software Manager from the Linux Mint menu
In the Software Manager search field, type openvpn.
Search for openvpn in Software Manager
If the following packages are not installed, install them using the Software Manager interface:
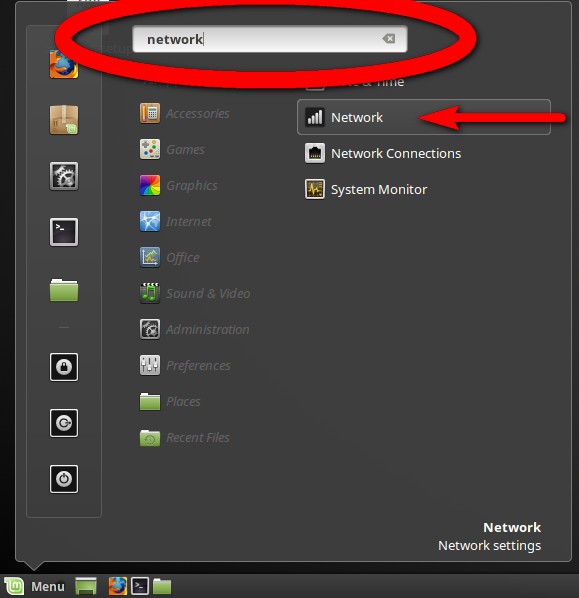
Click the Linux Mint Menu button and type network in the search bar. Select the Networking Configuration Manager.
Select Network
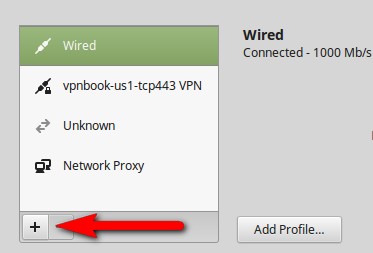
Add a new connection by pressing the plus symbol beneath the list of available networks.
Add a new network connection
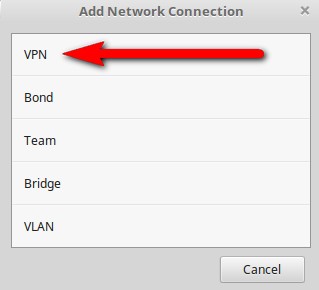
Select VPN from the Add Network Connection options.
Select VPN from the options
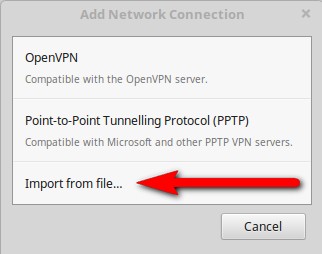
Select Import from file…
Import from file…
Navigate to your certificate folder, chose a certificate (.ovpn file) and press Open to import that file.
Chose a certificate file
A User Certificate, CA Certificate and Private Key are extracted from the vpnbook certificate file and stored on your computer. File locations can be obtained by clicking the folder icon adjacent to each file.
Enter the username and password in the appropriate fields and press Add to complete the Add Network Connection process.
It is important to note that the username and password are case sensitive.
Add username and password
The new network connection will now be visible in the Networking manager. It can be enabled and disabled in the Networking manager to test the connection.
Connection added to Linux Mint Networking Manager
Most connection failures will be due to an incorrectly typed username or password. To edit a network configuration, select the network by left clicking it in the list, then press the crossed spanner and screw driver icon in the Networking manager.
Upon confirmation of connection success, close the Networking manager window.
How to use
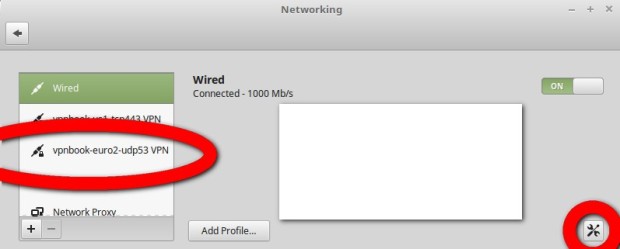
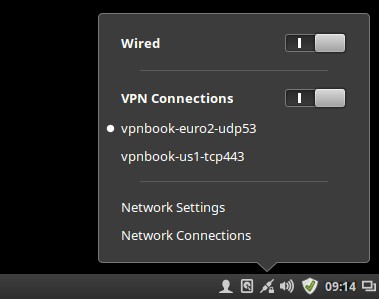
Left click the network icon (located at the bottom right of the Linux Mint task bar) to see a summary of available networks and those currently connected.
Linux Mint Network applet
Use the toggle switch to enable or disable VPN Connections.
If you have multiple VPN connections configured, the one in use will be shown at the top of the list with a bullet point to its left.
To connect to a different VPN network, use the Network Settings option to return to the Networking configuration manager. Enable and disable VPN connections there.
Note that the vpnbook password is changed frequently. If you find that a previously working vpn configuration fails to connect, visit vpnbook.com and obtain the new password. Then make the appropriate change in the configuration as described in step 3.
For the purpose of clarity, this is a review of the EcoAir DD1 Classic Mk5 Desiccant Dehumidifier (formerly DD122 Classic), purchased with hard-earned cash.
Overview
The EcoAir DD1 Mk5 Desiccant dehumidifier sets the bar for home desiccant dehumidifiers with its innovative design and a wealth of comprehensive features that optimize performance and save energy. It rectifies problem areas quickly and maintains them intelligently by toggling between full power, economy and standby modes as it senses the environment around it. This means that once your environment is under control, dehumidification requirements will be adjusted continuously so that power is only consumed when absolutely necessary. It works effectively at cold temperatures, even as low as 1ºC. Its operating range of 1ºC-40ºC makes this machine incredibly versatile for use in almost any home enclosure.
EcoAir DD1 Mk5 Classic Desiccant Dehumidifier
The EcoAir DD1 Classic Mk5 Desiccant Dehumidifier can be used to dry laundry indoors quickly yet keep humidity levels within a comfortable range. Clothes dried with the assistance of this dehumidifier smell fresher than those dried more slowly indoors.
The 3D-Louvre on top of the machine can be controlled to tackle problem areas quickly, like mould growth on a wall, by channeling airflow towards a target in a precise manner.
3D-Louvre
The selective Ioniser purifies the air by releasing negative ions from the air outlet. This has a normalizing effect on the human body, providing ideal conditions for breathing and relaxation. A silver filter traps airborne particles and kill bacteria on contact. The filter is designed to be cleaned very easily.
Desiccant technology means no more noisy compressor at the heart of the machine. This model is advertised as Whisper Quiet at only 34 dB(A). Measurements made confirm this fact, but whether or not you could sleep with this unit running in the same room is a moot point. However, it is barely audible at night when operating on a landing behind a closed bedroom door.
This slideshow requires JavaScript.
The unit has intuitive controls, a filter that is quick and easy to clean and a neat carrying handle that folds flush with the top of the unit.
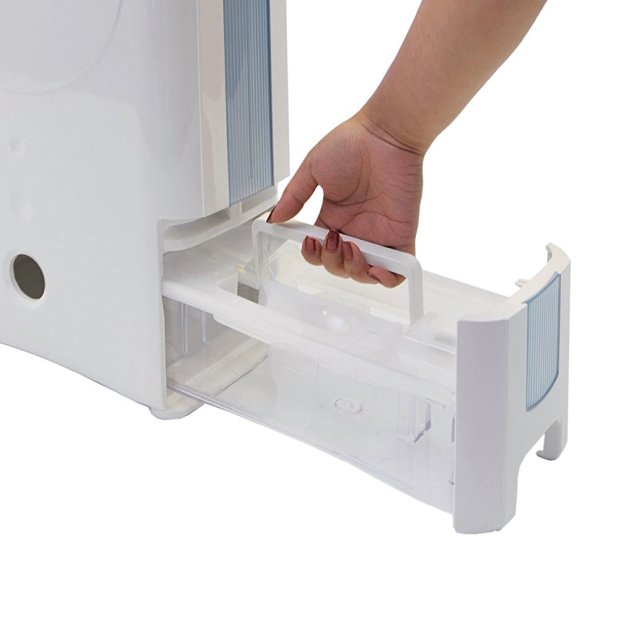
EcoAir DD1 Classic Mk5 Desiccant Dehumidifier Water Collection
The EcoAir DD1 Classic Mk5 Desiccant Dehumidifier has a water tank capacity of 2 Litres, which is simple to empty and replace. An anti drip mechanism prevents water drips when the tank is removed. Continuous drainage is possible with a supplied hose that can be plumbed into existing waste outlets.
What’s in the box?
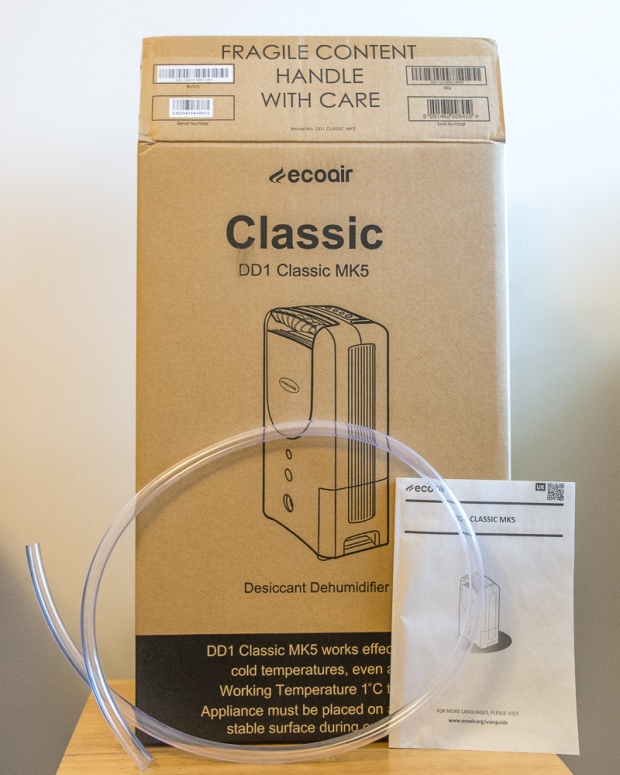
Packaging and Contents
The EcoAir DD1 Classic MK5 Desiccant Dehumidifier arrives well packaged with the main unit protected with polystyrene blocks. Included with the dehumidifier is a transparent hose 1.2m in length and 12mm in inner diameter. This can be connected to the dehumidifier if continuous drainage is desired. A manual, which contains the 2 Year Guarantee Card on the final page completes the ensemble.
Dehumidification extraction rate: 7 Litres/day @ 20ºC and 60% RH
Water tank capacity: 2 Litres (Continuous drainage possible)
Voltage: 220-240V @ 50Hz
Net weight: 6 Kg
Dimensions: 290mm x 475mm x 175mm
Review
Design
The EcoAir DD1 Classic Mk5 Desiccant Dehumidifier is impressively smart and fashionable in design and would compliment most decors and furnishings. It is slender enough to tuck away in a corner when not in use. And, it does not seem obtrusive at all when brought out for use. The blue light in the front grill is in vogue with modern appliances and rounds off a very pleasing design.
Operation
The push button controls on top of the unit are intuitive and easy to press. The dehumidifier can be programmed for simple or specific tasks with just a few button presses.
Essentially, the amount of noise emitted from the machine is governed by the two power settings, economy and high. The type of sound that is created is akin to the noise made by the fan in an extraction hood, common to most kitchens. If you want some idea of how this unit will sound, and more importantly, how loud it will be, go into your kitchen and listen to your extractor fan on low and high settings. The video below compares the sound from the EcoAir DD1 Classic Mk5 Desiccant Dehumidifier with the fan of an extractor hood. Sound intensity levels from both units are also measured and displayed for comparative purposes. Advertised as Whisper Quiet at 34 dB(A), measurements made during the making of this video confirm that the intensity of the sound emitted is correct. However, the type of noise created is unlike a whisper, and in my opinion, it is not pleasant to listen to. Nontheless, behind a closed door, the noise is barely noticeable.
Sound measurements taken at a distance of 1 metre (3ft) from all sources.
On the high power setting, the EcoAir DD1 Classic Mk5 Desiccant Dehumidifier will dehumidify a room to comfortable levels within a very short period of time. Additionally, the unit will dry partially dried washing very quickly and wet washing reasonably quickly, and at the same, heat the room and maintain a comfortable humidity level. Clothes dried rapidly in this way smell fresher than clothes that are dried more slowly on radiators or airers. Although this dehumidifier cannot compete with the drying times of tumble driers, the EcoAir DD1 Classic Mk5 Desiccant Dehumidifier is a viable alternative for those seeking to dry their laundry in a smarter way; where space is at a premium or home occupancy is low.
This model uses 300W and 590W of power in economy and high power modes respectively. You can calculate the cost of using this appliance by entering these details and your electricity tariff in this calculator. To give you an idea of the energy cost, you will also need to enter how often you expect to use this device.
Don’t be alarmed when you see the prediction! The EcoAir DD1 Classic Mk5 Desiccant Dehumidifier really is an efficient device. This means you will not need to run it as often as you first thought. It will get humidity levels in your home under control very quickly and then it will be a case of running the unit when needed to maintain those levels, or to dry laundry effectively.
Change your habits
Condensation will not disappear instantly when a dehumidifier is in operation. If you are generating excessive amounts of water vapour from cooking, boiling a kettle, washing, showering or bathing, it will be necessary to ventilate your property by opening windows and using extractor fans to expel the excessive humidity.
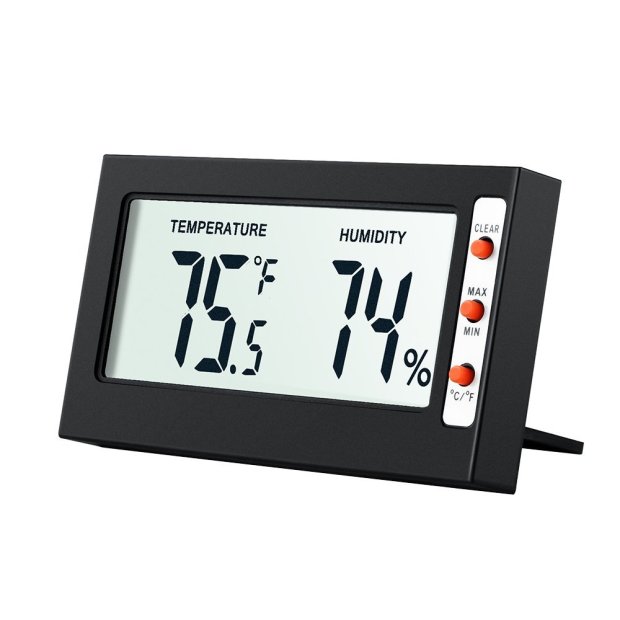
Digital Temperature – Hygrometer
Invest in a digital hygrometer that will measure and display the humidity level of the room you keep it in. Switching on your dehumidifier only when humidity levels are excessive will keep your energy costs low. If you own a home weather station or a modern smart phone, then the chances are that you already have a hygrometer at hand.
Conclusion
Positives:
Sleek, modern design and aesthetically pleasing. Its slender design makes it easy to store.
Incorporates intelligent features that run in parallel to optimise efficiency and reduce power consumption.
Desiccant technology means a consistent extraction efficiency over a large temperature range. Extraction rate of 7 Litres/day @ 20ºC and 60% RH.
2 Litre water collection tank capacity with the option for continuous drainage.
No compressor means a quieter product.
3D-Louvre system can target problem areas by channeling airflow precisely.
Purifies the air with negative ions to aid breathing and relaxation.
Silver filter scrubs air particulate matter and kills bacteria on contact.
Dries laundry very quickly while maintaining comfortable humidity levels and thereby preventing condensation.
Works so effectively that you will use it occasionally rather than continuously. This keeps energy costs down.
Built in shutdown timer.
Lightweight and easy to carry at only 6Kg.
Negatives:
Although the intensity of noise produced is low and in keeping with that stated by the manufacturer, the type of noise produced in unpleasant to listen to, especially in the high power mode. However, the noise is barely detectable through closed doors. That said, deployment times and locations can be organised so as not to annoy people in the home.
Although this dehumidifier contains a hygrometer to measure the humidity level around it, it does not display that measurement. This would have been a useful feature.
The humidity thresholds at which the dehumidifier switches to economy, high power and standby modes are preset and cannot be altered. The option to change these would have been beneficial for refining power savings.
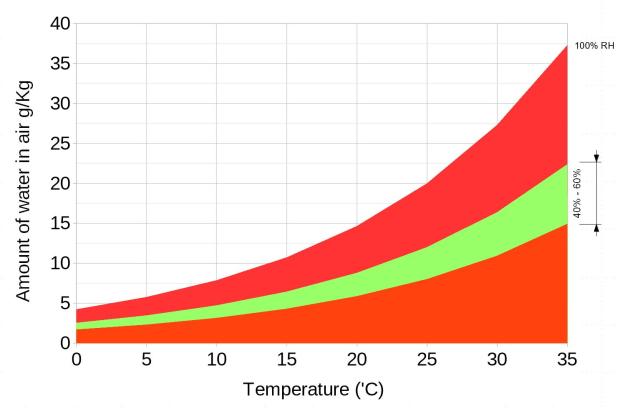
There will always be water vapour (or moisture) in the air. Water vapour in the air is measured as the ratio of the actual amount of water vapour in the air to the amount it could hold when saturated, and expressed as a percentage. This measurement is known as % Relative Humidity (% RH). Too much or too little moisture in the home can be unhealthy and uncomfortable. The optimum humidity range is 40% – 60% RH.
It is important to maintain a consistent humidity range to preserve your home and possessions and at the same time, remain comfortable and healthy.
Low Humidity
If indoor humidity is too low, this can lead to excess drying which in turn can cause skin irritations, eczema, chapped hands and a dry nose. It can also cause damage to wooden furniture, musical instruments and works of art by drying them out too much.
High Humidity
High humidity indoors causes condensation and damp. The damp left by condensation can damage plaster, wall paper, furniture, vehicles, timber, windows, doors and clothes.
Damp areas are breeding grounds for anaerobic bacteria in the air, which land in patches of moisture and then thrive, ultimately resulting in visible mould, fungus and the accompanying musty smells.
% Relative Humidity Guide
Condensation
The graph below shows the relationship between temperature and the amount of water that can be held in the air at 1 Atmosphere of pressure.
Warm air has the potential to hold more moisture than colder air. When the air inside the house becomes colder, the moisture content in the air can no longer be held as the air becomes saturated and water molecules coalesce to form droplets of water on colder surfaces like windows, bathroom mirrors and walls. This is condensation caused by a rapid increase in % relative humidity.
This is a fault finding and repair guide for the Nikon MH-25 battery charger.
Nikon charger not working | Nikon battery charger MH-25 not working | Nikon battery charger no light | Nikon battery charger not blinking | How to open charger MH-25?
Work in a well lit area and consider having the means to magnify the pcb board if your eye sight is poor.
Step 3 – How To Take the Nikon MH-25 Battery Charger Apart
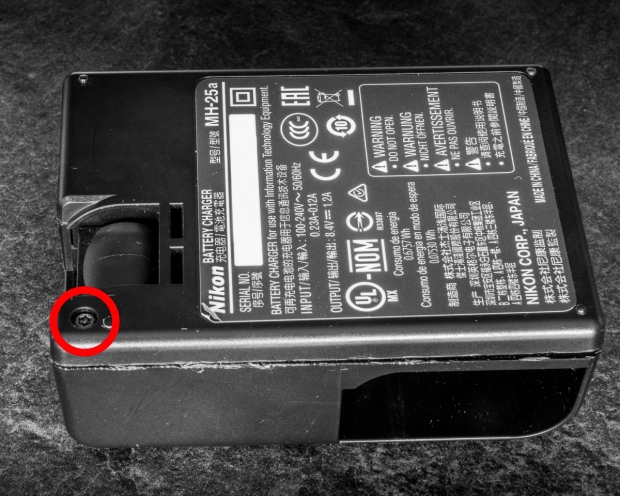
The Nikon MH-25 battery charger is held together with one small Torx screw and lots of glue.
The Single Torx Screw on the Rear of the Nikon MH-25 Battery Charger
The head of the Torx screw can be seen at the rear of the charger, next to the power connector. Unscrew it and store it safely at one side of your work area.
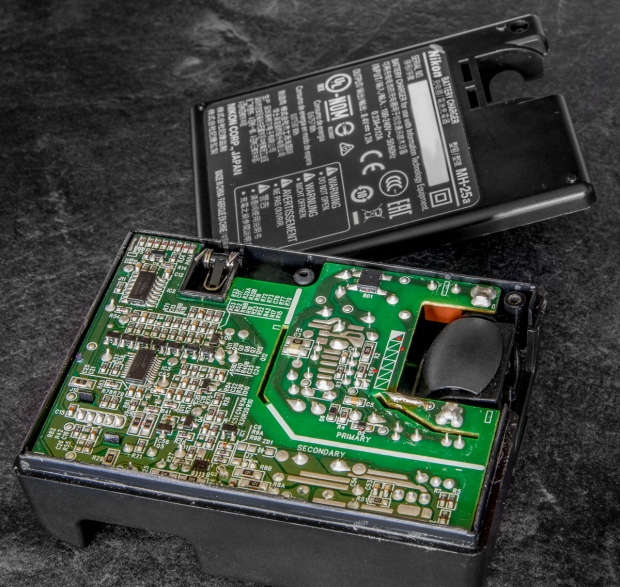
Using the flat bladed screwdriver, start to work your away around the unit, applying gently pressure to prise the two halves of the case apart. The glue is strong and this part of the procedure may take some time. You can see in the image above, the small amount of damage that is inevitable in prising the case apart.
When the back of the case is removed, the circuit board, rotary power connector and spring battery clip can be taken out easily.
The Rear of the Nikon MH-25 Battery Charger Case Removed
WARNING:
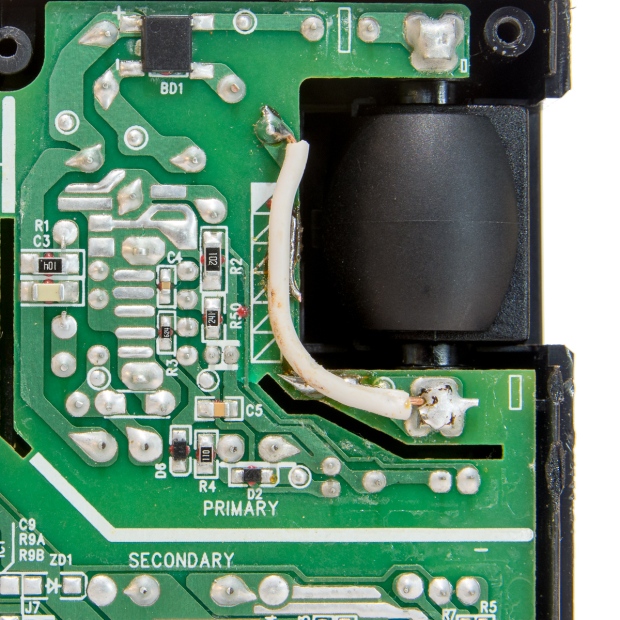
The rear of the Nikon MH-25 circuit board has two areas clearly labelled Primary and Secondary.
The Primary circuit deals with transforming incoming voltage to the lower voltage requirements of the Secondary charging circuit. It is possible to receive an electric shock by touching any of the points in the Primary circuit even when mains power is disconnected. The capacitors will hold charge for a significant period after mains power has been removed. The capacitors should dissipate their charge to reasonable levels a few minutes after the removal of mains power.
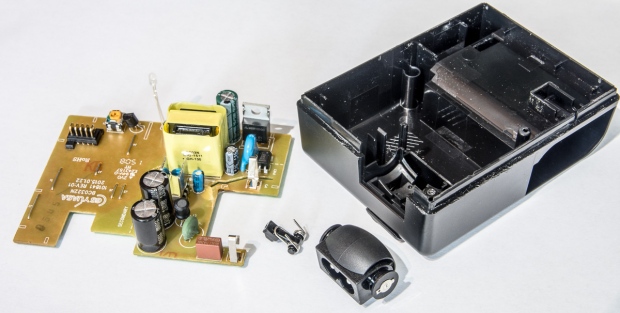
Components of the Nikon MH-25 Battery Charger
Step 4 – Inspect the Nikon MH-25 Printed Circuit Board
More than likely, most faults will be on the underside of the circuit board; the side with the printed tracks.
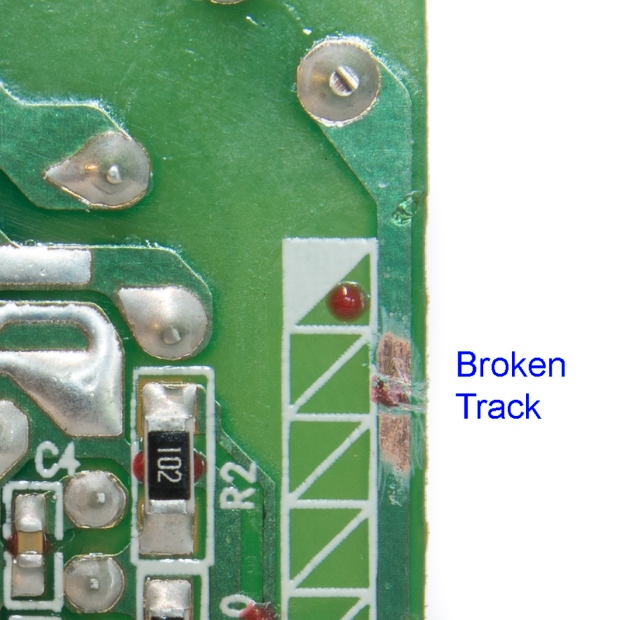
An examination of the printed circuit board from my Nikon MH-25 battery charger shows the track-side to be peppered with indentations and other mechanical induced marks. In my case, there are clear pot-marks on the incoming power rail, which have caused my unit to fail.
Look carefully at the tracks and solder points all over the board. Look for poorly soldered / loose joints and tracks that appear to be damaged or broken.
Re-solder loose/dry joints. Patch broken pcb tracks with solder and wire.
In order to solder to a broken rail, use a knife to scrape away the green insulation to reveal the copper surface beneath.
The image above shows two breaks on the same pcb track for incoming mains power. The larger red circle shows a repair that I made to the pcb track with wire and solder. The smaller red circle shows another potential break on the same pcb track
Nikon MH-25 Battery Charger PCB Track Break
Scratching away the discolouration on the pcb track with a knife clearly shows that this part of the track is broken too.
Broken tracks can be bridged with wire and solder. In this instance though, I decided to bypass the pcb track all together and run a sheathed wire between the two solder points rather than make another fiddly repair on the same track.
PCB Track Bypassed With Sheathed Wire
Step 5 – Reassemble the Nikon MH-25 Battery Charger
Reassembly of the Nikon MH-25 battery charger is relatively easy to do provided you follow these steps.
Take the rear part of the MH-25 battery charger case and lay it flat on your work surface.
Slot the circuit board on to the charger case.
Put this assembly to one side.
This slideshow requires JavaScript.
Lay the front part of the MH-25 battery charger case on your work surface.
Insert the rotary power connector so that it latches in the slide lock mechanism.
Insert the spring battery clip as shown.
This slideshow requires JavaScript.
Carefully bring the two assemblies together until they snap shut. Take care not to damage the LED.
Insert the Torx screw and tighten.
Connect the power cable and test.
Obtaining a Replacement Nikon MH-15 Battery Charger
If your repairs have been unsuccessful then consider the following options:-
I have written a Review of the RAVPower 2100mAh Rechargeable Camera Battery and Charger Set for Nikon cameras, a product which I have purchased and use on a daily basis. This kit consists of two replacement EN-EL15 batteries and a dual USB charger. It is less expensive than purchasing a replacement Nikon MH-25 charger and is a total power solution for your camera. Check the latest prices out in my review.
However, if you want to purchase another Nikon MH-25 battery charger then check out the prices on Amazon:


 - Black")
 - Black")
 - Black")


 & PlayStation 3 & Android&Steam - Not support the Xbox 360/One")
 & PS3 & Android (PS architecture) - [Black]")


You must be logged in to post a comment.