Guides

Mobile device will not connect to Zorin OS with Zorin Connect

Zorin OS is a highly polished Ubuntu-based Linux distribution providing an excellent alternative to Windows and MacOS. It is a an operating system that is gaining popularity (distrowatch) for many reasons. One of those reasons is the ability to integrate your Android mobile device with Zorin OS by utilizing the built-in Zorin Connect.

Once your mobile device is paired with Zorin Connect via your local area network, the technology releases a number of features and benefits including:

  • The ability to share files and web links between devices
  • Send and receive SMS text messages from and to the desktop
  • View your mobile device’s notifications on your desktop, including incoming calls
  • Control slideshows and multimedia on your desktop from your mobile device
  • Issue commands on your mobile device to execute on Zorin

And there’s plenty more.

Zorin OS Firewall can prevent the pairing of your mobile device with Zorin Connect

Zorin Connect | Pair Devices

If Zorin Connect fails to detect your mobile device on your local area network, then follow these steps to create a rule in your firewall to enable communication between them.

Step 1 – Open Zorin OS Settings

Zorin OS Settings

Click the Zorin ‘start’ button on your task bar and select Settings from the main menu.

Step 2 – Open Firewall Configuration

Zorin OS | Add Firewall Rule

In Settings, select Privacy and Firewall Configuration.
You will then be prompted to authenticate yourself by entering your password.

Step 3 – Check Firewall Status

Zorin OS | Firewall Status

At this point, you can opt to turn off the Zorin Firewall to see if Zorin Connect discovers your mobile device successfully.

Step 4 – Zorin Connect Protocols and Ports

At the time of writing, Zorin Connect communicates using the following protocols and ports:

  • IPv4 TCP 1716
  • IPv4 UDP 1716
  • IPV6 TCP 1739

To check this is still the case, hold down Ctrl + Alt + T at the same time to open a terminal window on your desktop. Highlight the command below then hold down Ctrl + C to copy it to the clipboard. Then, right-click and select Paste in the terminal window. Make sure that Zorin Connect is running when you do this.

sudo lsof -i -P -n | grep gjs
Zorin Connect | Protocols and Ports

The lsof command displays information about files that are opened by processes. grep filters the output list to show results for gjs, the process name for Zorin Connect.

Step 5 – Create Firewall Rules

Zorin Firewall | Create Firewall Rules for Zorin Connect

Click the Report tab in the Firewall configuration window. Then, click the Application column header to group the instances of gjs-console together.

Select the top instance of gjs-console to prevent the list from jumping around. Then press the plus (+) symbol at the bottom of the window.

Zorin OS | Add Firewall Rule

A firewall rule will be created automatically. Make sure to click the Add button and then the Close button to return to the Firewall Report.

Add firewall rules for the remaining two instances of gjs-console.

Step 6 – Review Firewall Rules for Zorin Connect

Click the Rules tab in the Firewall configuration window to review the rules you have just set up for Zorin Connect.

Backup Minecraft Worlds from an iPad or iPhone with a PC

How to backup Minecraft Worlds created on an Apple iOS device, to a PC and then restore them.

This article describes how to make a copy of your Minecraft Worlds created on Apple iOS mobile devices such as the ipad or iPhone, to a PC without using iTunes.

This is particularly useful if the Minecraft app becomes corrupt and you need to re-install it from the App Store. Before an app can be reinstalled on an iOS product, it has to be deleted first. The deletion process removes all associated data with that app, in this case your Minecraft Worlds. And, you don’t want to lose them, do you?

Attempting to make backups with iTunes is well documented on the internet but  can lead to frustrating errors such as:

"games" could not be copied because an error occurred. A duplicate file name was specified.

The following method works flawlessly and will prevent loss of your Minecraft Worlds if you ever find it necessary to re-install Minecraft on your iPad or iPhone.  There’s also no need to install iTunes on your PC.

What You Will Need

  • A PC running Windows. This computer will require a USB port.
  • The USB to iOS mobile device charging lead.
  • Syncios installed on your computer.

Syncios is a free, powerful and comprehensive tool to manage and transfer  files between an iOS device and a PC/MAC.

Steps to Backup and Restore Your Minecraft Worlds with a PC in the Event of Minecraft Re-Installation on an iOS Device

  1. Download and install the free version of Syncios to your computer.
  2. Launch Syncios on your computer.
  3. Connect your mobile iOS device to your computer with the charging lead and the computer’s USB port.
  4. If this is the first time you have connected your device to your computer, your mobile iOS device will ask to trust the connection. Trust the computer.
  5. Syncios will take a few moments to detect your iOS mobile device. And, when it does, it will display an overview of the detected device.
  6. Dismiss the warning: Turn off iTunes and do not operate your mobile device directly when running Syncios.
  7. Select Apps from the left-side menu.
Syncios | My Devices
  1. Scroll through your installed apps until you find Minecraft.
  2. Under the

    Actions column, click the ‘eye’ on the right-hand side of the trash can to open Minecraft’s app documents.

Syncios | Open the Minecraft App Documents Folder

  1. Double-click the games folder.
Syncios | Double-click the games Folder
  1. Double-click the com.majong folder.
Syncios | Double-click com.mojang folder
  1. Inside this folder is a folder called minecraftWorlds, which contains your saved game data. The contents of this folder can be copied to your computer in two ways: Either tick the box next to the folder name and then click Export OR drag and drop the folder from Syncios to an open folder on your desktop.
Syncios | Export minecraftWorlds to PC
  1. Check the content of your copied folder by exploring within on your PC. The Minecraft Worlds are each saved in separate folders named with unique random characters and ending with =
Minecraft Worlds contained in a Separate Folder
  1. Disconnect your iOS mobile device from the computer.
  2. Delete the Minecraft app from your mobile iOS device then re-install it from the Apple App Store (you won’t have to pay again).
  3. Launch Minecraft on your mobile iOS device and create a new world. Then, exit the Minecraft app.
  4. Re-connect your mobile iOS device to your computer and wait for Syncios to detect your device.
  5. in Syncios, navigate to AppsMinecraftDocuments/com.mojang/games/minecraftWorlds in the same manner as steps 7 to 11.
  6. On your computer, enter the minecraftWorlds folder and select all folders by clicking the first folder, holding down the shift key and selecting the last folder.
PC | Select All Your Minecraft World Folders
  1. Drag and drop all your selected folders to the Syncios folder panel to copy your Minecraft Worlds back to your iOS mobile device.
Syncios | Minecraft Folders Copied Back to iOS Mobile Device
  1. Close Syncios and disconnect your iOS mobile device from your computer.
  2. Launch Minecraft and enjoy!

Block Spam SMS With No Number

‘Block’ Spam SMS With No Number

Spam text messages without number | How to block messages without number | How to block sms without number | Spam text with no number | How to block sms without number in Samsung | sms no number | How to block spam sms with a name not number

This article describes how to ‘block’ spam SMS text messages that have a name instead of a number and is specific to smartphones that use the Android operating system.

Without installing any third-party apps, this guide shows the steps taken on a Samsung S8 smartphone to ‘block’ spam SMS messages that have no number, by constructing a filter to identify and capture them.

Samsung S8

It replaces an older article written for the Samsung S3 mobile phone: How To Block Text Message SMS Spam on Samsung Galaxy Phones (Android)


Smartphones that run on an Android operating system are capable of diverting spam SMS text messages to a spam folder, even if the telephone number is absent from the message or the telephone number has been replaced with a name. Although these messages are still received by your handset, the method of identifying and diverting spam in this way creates the illusion that the nuisance message has indeed been blocked.

To ‘block’ spam SMS text messages that have a name instead of a number, follow these simple steps:-

STEP 1: Open the Samsung Messages app.

Samsung S8 Messages App

STEP 2: Identify the spam SMS text message and tap it.

Identify Spam SMS


STEP 3: Take note of the keywords or phrases that are in every message received.

SPAM SMS Message – Note the Keywords

In this example, I use the name of the sender, LloydsBank and the word ENTRIES.

STEP 4: Go back to your list of messages by pressing the back arrow, top left.

STEP 5: Open message options by tapping the three dots at the top right of the screen

Message Options

STEP 6: From the options that appear, tap Settings.

STEP 7: Tap Block messages

Block messages

STEP 8: Tap Block phrases – Manage the phrases that will cause incoming messages to be blocked.

Block phrases

STEP 9: Enter the keywords or phrases noted in step 3.

Block keywords and phrases

Type a keyword or phrase then tap the plus (+) symbol to add it to the list. Remove a keyword or phrase by tapping the minus (-) symbol associated with that text.

As soon as a keyword or phrase is entered, then any new SMS message that contains that text will be diverted to the Blocked messages folder and effectively ‘blocked’.

It is important to note that:-

  • phrase matching is not case sensitive and all text entries are stored in lower case.
  • if a genuine SMS text message contains one of your chosen keywords or phrases, then that message will be ‘blocked’ too. It is therefore important to choose your keywords and phrases carefully.

STEP 10: You’re done!

Return to the Messages main list by tapping the back arrows on each of the option screens.

How to check Blocked messages

Once you have your keywords and phrases in place, it is worth checking your spam SMS folder occasionally to check its effectiveness.

Blocked messages

The Blocked messages list can be accessed from the Messages main conversation screen by tapping the three dots, top right, and selecting:-

Settings > Block messages > Blocked messages

Samsung Wireless Chargers

How to set up OpenVPN on Linux Mint

How To Set Up OpenVPN on Linux Mint

This guide describes the steps taken to set up the free OpenVPN service on Linux Mint and create a toggle switch in the Network Connections applet to simplify its use.

A VPN connection toggle switch circumvents the need to launch the OpenVPN service by typing a command in a terminal window. Additionally, multiple VPN networks can be added to the Network Connection applet as desired, to manage all your VPN networks effectively.

Linux Mint VPN Network Connection using the free OpenVPN service

Linux Mint VPN Network Connection using the free OpenVPN service

In brief, the steps required are:

  1. Visit vpnbook.com and download the free OpenVPN Certificate Bundles to your computer.
  2. Install the OpenVPN network daemon, network management framework and OpenVPN plugin core using Software Manager.
  3. Create a VPN network connection using one of the downloaded OpenVPN Certificates.

1. Download the free OpenVPN Certificate Bundles to your computer.

Free OpenVPN is the best and most recommended open-source VPN software world-wide.

Visit vpnbook.com/freevpn and download one or more Certificate Bundles appropriate for your needs.

Also, make a note of the Username and Password that are displayed beneath the list of certificates.

The Certificate Bundles are provided in a compressed file and need to be extracted. Go to your download folder and right-click the downloaded zip file. Select Extract Here to unzip the files quickly inside your download folder.

Right-click and select Extract Here

Right-click and select Extract Here

At this point, you may want to create a dedicated certificate folder in which to store all your extracted certificates.

2. Install the OpenVPN software.

Launch Linux Mint Software Manager from the Menu and enter your password when prompted.

Select Software Manager from the Linux Mint menu

Select Software Manager from the Linux Mint menu

In the Software Manager search field, type openvpn.

Search for openvpn in Software Manager

Search for openvpn in Software Manager

If the following packages are not installed, install them using the Software Manager interface:

  • Openvpn | Virtual private network daemon.
  • Network-manager-openvpn-gnome | Network management framework (openvpn plugin gnome gui).
  • Network-manager-openvpn | Network management framework (openvpn plugin core).

3. Create a VPN network connection

Click the Linux Mint Menu button and type network in the search bar. Select the Networking Configuration Manager.

Select Network

Select Network

Add a new connection by pressing the plus symbol beneath the list of available networks.

Add a new network connection

Add a new network connection

Select VPN from the Add Network Connection options.

Select VPN from the options

Select VPN from the options

Select Import from file…

Import from file...

Import from file…

Navigate to your certificate folder, chose a certificate (.ovpn file) and press Open to import that file.

Chose a certificate file

Chose a certificate file

A User Certificate, CA Certificate and Private Key are extracted from the vpnbook certificate file and stored on your computer. File locations can be obtained by clicking the folder icon adjacent to each file.

Enter the username and password in the appropriate fields and press Add to complete the Add Network Connection process.

It is important to note that the username and password are case sensitive.

Add username and password

Add username and password

The new network connection will now be visible in the Networking manager. It can be enabled and disabled in the Networking manager to test the connection.

Connection added to Linux Mint Networking Manager

Connection added to Linux Mint Networking Manager

Most connection failures will be due to an incorrectly typed username or password. To edit a network configuration, select the network by left clicking it in the list, then press the crossed spanner and screw driver icon in the Networking manager.

Upon confirmation of connection success, close the Networking manager window.


How to use

Left click the network icon (located at the bottom right of the Linux Mint task bar) to see a summary of available networks and those currently connected.

Linux Mint Network applet

Linux Mint Network applet

Use the toggle switch to enable or disable VPN Connections.

If you have multiple VPN connections configured, the one in use will be shown at the top of the list with a bullet point to its left.

To connect to a different VPN network, use the Network Settings option to return to the Networking configuration manager. Enable and disable VPN connections there.

Note that the vpnbook password is changed frequently. If you find that a previously working vpn configuration fails to connect, visit vpnbook.com and obtain the new password. Then make the appropriate change in the configuration as described in step 3.

How To Repair A Nikon MH-25 Battery Charger

How To Repair A Nikon MH-25 Battery Charger

This is a fault finding and repair guide for the Nikon MH-25 battery charger.

Nikon charger not working | Nikon battery charger MH-25 not working | Nikon battery charger no light | Nikon battery charger not blinking | How to open charger MH-25?

The Nikon MH-25 Battery Charger

The Nikon MH-25 Battery Charger

The Nikon MH-25 is a mains operated battery charger for the EN-EL15 lithium-ion battery, which is specific to a variety of Nikon cameras including the D800, D600, D7000, D7100 and D7200.

This article is a general repair guide for the Nikon MH-25 battery charger and shows:-

  • How to fault find the Nikon MH-25 battery charger when the LED light fails to blink to indicate a charging state.
  • How to dismantle / take apart the Nikon MH-25 battery charger.
  • How to inspect the Nikon MH-25 printed circuit board (pcb) for common electrical faults.
  • How to repair the Nikon MH-25 battery charger pcb.
  • How to reassemble the Nikon MH-25 battery charger.

Step 1 – Conduct Simple Tests

  • Make sure the power cable is pushed firmly into the Nikon H-25 battery charger.
  • Try a different power outlet.
  • Try a different figure of eight cable from another device.
  • If you have a UK model, change the plug fuse and re-try the Nikon MH-25 battery charger. The fuse rating is 3 Amps.

If your Nikon MH-25 battery charger is still non functional after these tests and you want to attempt a repair yourself, then jump to step 2.


Alternatively, find a replacement MH-25 battery charger here:

Nikon MH-25 UK Battery Charger for EN-EL15

Nikon 1900 mAh Lithium Ion Rechargeable Battery for D800/D600/D7100/D7000

MH-25 battery charger variants


Step 2 – What You Will Need

To take apart the Nikon MH-25 battery charger you will need the following items:

  • A precision Torx screwdriver set.
  • A flat blade screwdriver with a long shank to assist with leverage.

Tools Required to Dismantle the MH-25 Battery Charger Case

Tools Required to Dismantle the Nikon MH-25 Battery Charger Case

For any electrical repair on the circuit board, you will need:

  • A soldering iron with a fine tip.
  • Solder.
  • Sheathed wire.
  • Wire cutters or scissors.
  • Long nosed pliers.
  • A knife.

Work in a well lit area and consider having the means to magnify the pcb board if your eye sight is poor.

Step 3 – How To Take the Nikon MH-25 Battery Charger Apart

The Nikon MH-25 battery charger is held together with one small Torx screw and lots of glue.

The Single Torx Screw on the Rear of the Nikon MH-25 Battery Charger

The Single Torx Screw on the Rear of the Nikon MH-25 Battery Charger

The head of the Torx screw can be seen at the rear of the charger, next to the power connector. Unscrew it and store it safely at one side of your work area.

Using the flat bladed screwdriver, start to work your away around the unit, applying gently pressure to prise the two halves of the case apart. The glue is strong and this part of the procedure may take some time. You can see in the image above, the small amount of damage that is inevitable in prising the case apart.

When the back of the case is removed, the circuit board, rotary power connector and spring battery clip can be taken out easily.

The Rear of the Nikon MH-25 Battery Charger Case Removed

The Rear of the Nikon MH-25 Battery Charger Case Removed

WARNING:

The rear of the Nikon MH-25 circuit board has two areas clearly labelled Primary and Secondary.

The Primary circuit deals with transforming incoming voltage to the lower voltage requirements of the Secondary charging circuit. It is possible to receive an electric shock by touching any of the points in the Primary circuit even when mains power is disconnected. The capacitors will hold charge for a significant period after mains power has been removed. The capacitors should dissipate their charge to reasonable levels a few minutes after the removal of mains power.

Components of the Nikon MH-25 Battery Charger

Components of the Nikon MH-25 Battery Charger

Step 4 – Inspect the Nikon MH-25 Printed Circuit Board

More than likely, most faults will be on the underside of the circuit board; the side with the printed tracks.

An examination of the printed circuit board from my Nikon MH-25 battery charger shows the track-side to be peppered with indentations and other mechanical induced marks. In my case, there are clear pot-marks on the incoming power rail, which have caused my unit to fail.

This youtube video shows an example where solder joints have not been completed properly during the manufacturing process and a small knock can be enough to dislodge components from the electrical circuit.

However, it is worth taking a look at the electronic components too while the board is out of the case.

Top side / component side of MH-25 pcb

Check the condition of the capacitors. Look for capacitors that may have blown and replace them if necessary.

Bottom side / pcb side of MH-25

Look carefully at the tracks and solder points all over the board. Look for poorly soldered / loose joints and tracks that appear to be damaged or broken.

Re-solder loose/dry joints. Patch broken pcb tracks with solder and wire.

In order to solder to a broken rail, use a knife to scrape away the green insulation to reveal the copper surface beneath.

Nikon MH-25 Battery Charger Printed Circuit Boared

Nikon MH-25 Battery Charger Printed Circuit Boared

The image above shows two breaks on the same pcb track for incoming mains power. The larger red circle shows a repair that I made to the pcb track with wire and solder. The smaller red circle shows another potential break on the same pcb track

Nikon MH-25 Battery Charger PCB Track Break

Nikon MH-25 Battery Charger PCB Track Break

Scratching away the discolouration on the pcb track with a knife clearly shows that this part of the track is broken too.

Broken tracks can be bridged with wire and solder. In this instance though, I decided to bypass the pcb track all together and run a sheathed wire between the two solder points rather than make another fiddly repair on the same track.

PCB Track Bypassed With Sheathed Wire

PCB Track Bypassed With Sheathed Wire

Step 5 – Reassemble the Nikon MH-25  Battery Charger

Reassembly of the Nikon MH-25 battery charger is relatively easy to do provided you follow these steps.

  • Take the rear part of the MH-25 battery charger case and lay it flat on your work surface.
  • Slot the circuit board on to the charger case.
  • Put this assembly to one side.

This slideshow requires JavaScript.

  • Lay the front part of the MH-25 battery charger case on your work surface.
  • Insert the rotary power connector so that it latches in the slide lock mechanism.
  • Insert the spring battery clip as shown.

This slideshow requires JavaScript.

Carefully bring the two assemblies together until they snap shut. Take care not to damage the LED.

Insert the Torx screw and tighten.

Connect the power cable and test.

Obtaining a Replacement Nikon MH-15 Battery Charger

If your repairs have been unsuccessful then consider the following options:-

I have written a Review of the RAVPower 2100mAh Rechargeable Camera Battery and Charger Set for Nikon cameras, a product which I have purchased and use on a daily basis. This kit consists of two replacement EN-EL15 batteries and a dual USB charger. It is less expensive than purchasing a replacement Nikon MH-25 charger and is a total power solution for your camera. Check the latest prices out in my review.

However, if you want to purchase another Nikon MH-25 battery charger then check out the prices on Amazon:

Nikon MH-25 UK Battery Charger for EN-EL15

Spare battery:
Nikon 1900 mAh Lithium Ion Rechargeable Battery for D800/D600/D7100/D7000

Dual MH-25 battery chargers, USB MH-25 battery chargers and non Nikon MH-25 battery chargers:
Search Amazon for MH-25 battery charger variants

Delete Hotmail Account Without Mobile Number

Years ago, many of us created hotmail accounts simply to use MSN Messenger (Windows Live Messenger)  – and send and receive a few emails of course. Following the discontinuation of the messenger client in 2006, my hotmail account became dormant as I had moved over to other providers for my instant messaging and email needs. Just recently though, I needed to brush the cobwebs off my ageing hotmail account and log in to check an old email.

I was appalled at the fact that I could not just log in and get on with my work as Microsoft tried to embark upon a data collection exercise. It was at this point that I decided I was going to delete my hotmail account for good without providing my personal telephone number and email address.


Even if you are logging into one of your old hotmail accounts to delete it, Microsoft insist on taking your mobile phone number and another one of your email addresses before you reach the option to close the account. This stage cannot be bypassed.

Here’s how to work around the forced two-step authentication process and delete your hotmail account without providing your personal mobile telephone number and another one of your email addresses to Microsoft.

It can be done by using a disposable mobile telephone number and a disposable email address.

WARNING: Only follow this procedure if you want to delete your hotmail account. It is not advised to use a temporary disposable phone number and email address on an account you wish to keep.

How to delete a hotmail account without providing your personal details:

1 .Log in to your hotmail account with your username and password.

If you have never associated a telephone number with your hotmail account, you will see this prompt:

Help us protect your account.

Hotmail | Help Us Protect Your Account

Hotmail | Help Us Protect Your Account

This step cannot be bypassed, even though you just want to delete your account.

2. Obtain a disposable mobile number for free.

Visit SMSReceiveFree and choose a telephone number from the list.

Disposable Mobile Phone Numbers | SMSReceiveFree.com

Disposable Mobile Phone Numbers | SMSReceiveFree.com

In the Microsoft form:-

Enter that number, taking account of the country code.

Choose whether you would like to receive a mobile phone number verification code via text SMS message or voicemail (Call).

Click Next.

3. Enter the Microsoft verification code.

On the SMSReceiveFree website, click the mobile number that your entered in step 2.

Wait for your SMS text message or voicemail to arrive.

Received SMS Text Messages and Voicemail | SMSReceiveFree.com

Received SMS Text Messages and Voicemail | SMSReceiveFree.com

When your code arrives, complete the Microsoft telephone verification process.

Hotmail | Enter Verification code

Hotmail | Enter Verification code

4. Obtain a disposable email address for free.

Similarly, Microsoft will then ask you to provide a second email address for the hotmail account you are about to delete.

Google disposable email to find a temporary disposable email provider.

Guerillamail

Guerillamail

Enter the random email address in the Microsoft form.

Wait for an email confirmation and respond to it to complete the email verification process.

5. Hotmail protect your account.

Once Microsoft have a mobile telephone number and a second email address associated with your hotmail account, you will be asked to Protect your account before you are allowed access to the sensitive information like emails and settings.

Microsoft Hotmail/Live | Protect Your Account

Microsoft Hotmail/Live | Protect Your Account

Complete the form by using the telephone number you used in steps 1 and 2.

6. Delete your hotmail account.

At this stage, you should now have full access to your hotmail account.

Before deleting your account, take steps to delete all your emails and remove them from Trash. Delete your profile information and profile picture.

Delete your hotmail account.

How To Convert ZX Spectrum Programs From Cassette Tape To TZX Files

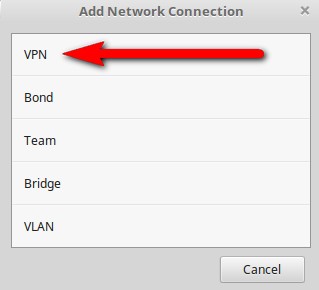
How To Transfer ZX Spectrum Programs From Cassette Tape To Computer TZX Files

This article describes an effective method to transfer ZX Spectrum programs from cassette tape to a computer and  convert those files for storage in the TZX file format.

C15 Computer Cassette

ZX Spectrum Programs Stored on a WH Smith C15 Computer Cassette

Once preserved as TZX files, ZX Spectrum programs can be enjoyed on modern hardware capable of running ZX Spectrum emulators.


About This Guide:

This file transfer and conversion guide is based on a PC running Windows 10 in conjunction with the MakeTZX decoding engine by Ramsoft.

It records the steps I took to salvage all of my ZX Spectrum BASIC programs from tape that I wrote in the early eighties.

Hopefully, in following this guide, you should avoid the stumbling blocks I encountered and save yourself a lot of wasted time.

You are advised to read through this document in full before commencing in order to understand the process and gather the materials you need.

Enjoy this archiving process and looking through your old code!

Good luck!


1. What You Will Need To Transfer ZX Spectrum Programs From Cassette Tape To Your Computer And Convert Them To The TZX File Format

  1. A cassette tape containing ZX Spectrum games / programs.
  2. A cassette tape player with an amplified output connection; a headphone socket or similar.
  3. A computer running Windows or a Linux operating system. The computer must have a Line-In connector.
  4. A suitable cable to connect your cassette tape player to the Line-In connector on your PC.
  5. Ramsoft’s MakeTZX  software, appropriate for your operating system.
  6. Software to analyze and edit audio wave files.
  7. A ZX Spectrum emulator for your operating system.

1.1 Cassette Tape Containing ZX Spectrum Programs

Your cassette tape may be more than three decades old if it has had the good fortune of surviving from the early eighties. Certainly, you need to treat it with care as it is unlikely that you will have the data it contains  backed up on another tape.

Assess the condition of the cassette and the tape itself by inserting a pen into one of the spools and rotating it in the direction of normal tape transport. Repeat the process with the pen in the second spool to transport the tape in the opposite direction. Before proceeding, look for loops of tape that may have been thrown off the wound spools during storage.

Ensure the tape is wound properly on both spools before inserting it into a cassette tape player.

Turning a Cassette Tape Spool With a Pen

Turning a Cassette Tape Spool With A Pen

With the cassette inserted in a cassette tape player, fast forward the tape fully to one end, then rewind the tape completely.

1.2 Selection Of Cassette Tape Player

I found this to be the largest obstacle in achieving reliable data transfer from tape to computer. Why?

  • Households today are no longer abundant with cassette tape players, so choice is limited.
  • More recent cassette deck technology, that was not around in the eighties, may interfere with the signal being played back. Disable features such as Loudness, Mega Bass, DSGX, EQ, etc…

Disable Modern Features Such as Mega Bass

Disable Modern Features Such As Mega Bass

  • Less expensive cassette players may be built from cheap electronic parts that introduce noise and cause errors during data transfer. This particular issue cost me lots of time during this project. Shown below is an example of DC offset and noise caused by a poor tone control circuit of a cassette player that I tried to use.

Signal Errors | DC Offset and Noise

Signal Errors | DC Offset and Noise

  • Avoid using a hi-fi separate cassette deck without an amplifier. The output is unlikely to have sufficient and controllable gain on its own for good data transfer.

AKAI Stereo Cassette Deck HX-1

AKAI Stereo Cassette Deck HX-1

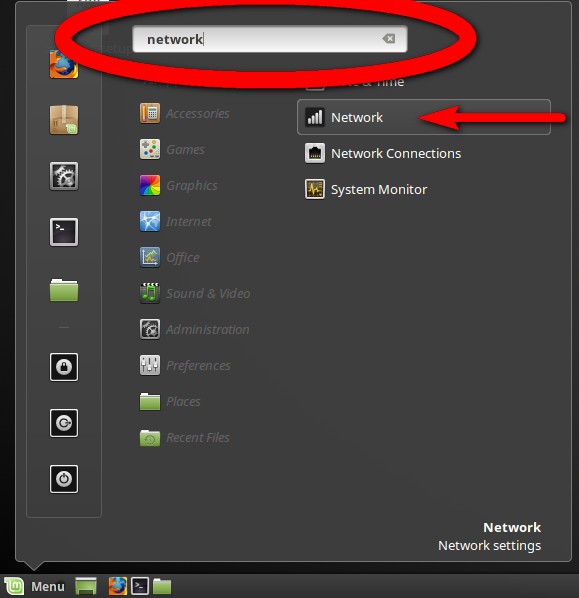
1.3 Identify The Line-In Connection Of Your Computer

Computer Line-In connections are typically made to accept 3.5mm stereo jacks.

Computer Line-In Connection

Computer Line-In Connection

Line-In connections are normally labelled on your computer and are therefore relatively easy to identify. Examine your computer / motherboard manual if you are unsure of the location.

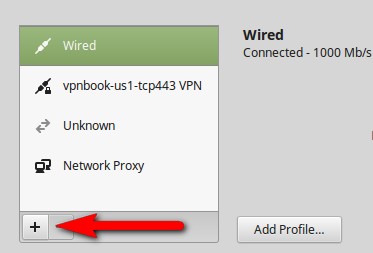
1.4 Connect The Cassette Deck To Your Computer

Using a suitable cable, connect your cassette tape player to the Line-In connection of your computer.

3.5 mm Stereo Phono Jack Cable and Adapter Plug

3.5 mm Stereo Phono Jack Cable And Adapter Plug

It is best to connect to an amplified output of the cassette deck so that signal levels can be adjusted with the volume control prior to data transfer. The headphone socket is usually a good choice.

Headphone Socket to Line-In

Headphone Socket To Line-In

You may require phone jack adapters or a cable with specific jacks to enable the connection.

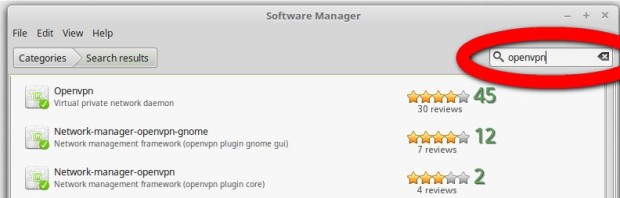
1.5 Download The MakeTZX Software

Visit Romsoft’s MakeTZX Homepage and download the appropriate software for your system.

Versions of MakeTZX are available for Windows, DOS, Linux x86 and Amiga from the MakeTZX Download Center.

If you have a Windows operating system, download the two compressed files, MakeTZX and WinGUI.

Download Both MakeTZX Files for Windows Operating Systems

Download Both MakeTZX Files For Windows Operating Systems

Uncompress both zip files. This will result in two separate folders. Then, move / copy the contents of one folder to the other so that all the following files are contained in one folder.

Merge The Contents of Both Folders | MakeTKZ Windows

Merge The Contents of Both Folders | MakeTKZ Windows

Make a note of the folder’s name or rename the folder if you prefer. This will be your working folder. This software requires no installation and can be run directly from this folder.

The file mtzxwgui.exe is a Windows graphical user interface designed to simplify configuration of the DOS-based sampler and TZX encoder, maketzx.exe

The file mtzxman.htm is the user manual for MakeTZX and can be viewed in your default web browser by double-clicking it.

1.6 Audio / Wave Editor

Although not essential, it is beneficial to have an audio / wave editor installed on your computer to assist with signal analysis, fault finding and editing.

Audacity is free, open source, cross platform software for recording and editing sounds. Audacity will run on Windows, Linux, Mac and other operating systems. It is highly recommended.

1.7 ZX Spectrum Emulator

There are many, free ZX Spectrum emulators available for all types of hardware and operating systems.

Recommended ZX Emulators:-

Download the ZX Spectrum Emulator – Spectacol – Android Apps from the Google Play store.

Download FUSE – ZX Spectrum Emulator for Linux, Windows, OS X and many other operating system.

Alternatively, use your favorite ZX Spectrum emulator. Just make sure that it is able to load TZX files.


2. How To Use MakeTZX To Transfer ZX Spectrum Files From Cassette Tape To Your Computer And Convert Them To TZX Files

2.1 MakeTZX Help File

The help file, mtzxman.htm,  as described in Step 1.5, is comprehensive and explains everything you need to know about MakeTZX. You may need to refer to this document if the conversion process fails at some point.

2.2 MakeTZX | Sampling Your Cassette Tape & TZX Encoding

Double click mtzxwgui.exe to launch the Graphical User Interface (GUI).

Enter a name for your Output file (TZX), i.e. OUTPUT.

Enable DirectMode and check Save WAV file.

Change the sampling rate to 48000 Hz.

DirectMode means that MakeTZX will use the Line Input of your sound card to capture and convert the input signal in real time.

MakeTZX WinGUI | Configuration for Sampling and Encoding

MakeTZX WinGUI | Configuration for Sampling and Encoding

Press the Start button. This will launch maketzx.exe in a console window with the configuration set in the GUI.

Upon launch, you are invited to set the input signal level from the cassette tape player to an appropriate level; a level high enough to have a good signal to noise ratio but not so high that signal clipping (distortion) occurs. Press Play on your cassette tape player and you should start to see the signal strength of the recording displayed dynamically on the text-based vu-meters.

MakeTZX VU Meters

MakeTZX VU Meters

Adjust the volume of the cassette tape player so that the signal strength is high but does not exceed the text Volume] within the vu-meter.  Signal strength greater than this will result in clipping and is detrimental to data transfer.

Once you are satisfied with the signal levels, Stop and Rewind the tape.

With the console window selected, press Return to start the sampling and conversion. Now press Play on the cassette tape player.

MakeTZX will now search for pilot header tones and data as the tape recording is played back. Details of program headers, and data blocks will be reported as the cassette tape plays. It is recommended to keep the cassette tape playing until you are certain that no more data exists on the tape. At that point, press Stop on the cassette tape player and with the console window selected, press a key to terminate sampling.

The output in the console window should look something like this:

MakeTZX Console Window

MakeTZX Console Window

The information displayed includes where data blocks start and stop, header lengths, the gap duration between data blocks (in milliseconds), program names, data files (“Bytes”) and any errors encountered.

At this point it is worth noting down these details by either copying the text in the console window to a text file or by capturing the console output as an image for reference later.

Notice that two files have been generated in your working folder; one is an uncompressed audio recording of the playback  (.wav file) and the other is a .tzx file.

MakeTZX Output Files

MakeTZX Output Files

Opting to save a digitized audio file is beneficial in removing any encountered errors without the need to re-sample from the cassette tape again. Details are provided towards the end of this document in section 2.5.

2.3 Testing The TZX File

TZX files store programs and data in the same sequential order that they were stored on cassette tape.

If a file association exists between your ZX Spectrum emulator and the extension .tzx, double-clicking a TZX file should open your ZX Spectrum emulator and then load the first program it encounters.

If no association exists, open your ZX Spectrum emulator, File > Open > your.tzx will load and run the first program in the sequence of programs.

If you want to load a program other than the first, open your ZX Spectrum emulator and go to Media > Tape > Open

Select the TZX file.

With the ZX Spectrum emulator window selected, press J , Ctrl+P, Your Program Name, Ctrl+P

This results in:

LOAD “Your Program Name and the flashing L cursor.

ZX Spectrum LOAD Program

ZX Spectrum LOAD Program

Press Return to load your program.

2.4 One TZX File For One Program

If you would prefer to make a TZX file for just program, this can be achieved by either:

  • Re-sampling that one program from cassette tape.
  • Cutting the program data from the digital audio file and submitting that data to maketzx.exe to make a new TZX file.

I found the latter to be the easiest and fastest method as it is time consuming to position the cassette tape accurately to sample a program mid-tape.

Using your preferred audio editor, load your sampled audio (.wav) file.

ZX Spectrum Programs & Data Sampled From Cassette Tape By MakeTZX

ZX Spectrum Programs & Data Sampled From Cassette Tape By MakeTZX

Using the output that you saved  earlier from the maketzx console window, you should be able to determine where your program resides in the wave form, based on the gaps between data blocks.

Highlight the section of the wave form that you wish to save and File > Save Selection As… to save an audio file of your selected program.

Alternatively, rename your file then delete portions of the wave form you don’t need until you are left with your program data.

Tip! Remember that a header precedes any program or data block and all associated data needs to be saved. The example below depicts two ZX Spectrum programs as audio waves. The top trace consists of a program header, which contains the name of the program. It is then followed by the program itself. This is a typical example of a simple ZX Spectrum BASIC program.

The bottom trace is one program but is more complex than the previous example as it consists of many data blocks and headers:-

  • Program header containing the name of the program
  • A short BASIC loader
  • A bytes header
  • Binary data (this could be a full screen picture, graphics data or machine code)
  • Program header
  • Program data
  • Bytes header
  • Binary data

All of these need to be selected to produce a working TZX file.

ZX Spectrum Data

ZX Spectrum Data

Launch the MakeTZX Win GUI and press the Browse button. Choose the modified audio file that you wish to convert. Ensure DirectMode is Disabled and click Start.

MakeTZX Win GUI Convert Audio File

MakeTZX Win GUI Convert Audio File

MakeTZX will then convert your audio file to a TZX file and output the details in the console window.

MakeTZX | One Program One TZX File

MakeTZX | One Program One TZX File

Test the generated TZX file by double clicking it or by loading it as tape media in your ZX Spectrum emulator.

2.5 MakeTZX | Removing Errors

MakeTZX incorporates an arsenal of powerful digital filters that are able to rectify many of the problems found on old tapes. The filters are explained in detail in section 11 of the user manual.

R Tape loading error, 0:1

R Tape loading error, 0:1

If you encounter a R Tape loading error, 0:1, load the wave file into MakeTZX WinGUI and enable the Digital Filter with the default settings. Ensure DirectMode is disabled then press Start to generate a new TZX file.

MakeTZX Digital Filter Enabled

MakeTZX Digital Filter Enabled

Refer to the accompanying documentation to determine what digital filters could work for your situation.

Also note that if you are attempting to transfer and convert a commercial game with this method, check Autodetect loader to circumvent the multitude of protection schemes that were used to prevent piracy.

If all else fails, re-sample the cassette tape recording with a different output level.

How To Install CPUMiner in Linux and Mine for ZiftrCOINs

How To Install CPUMiner in Linux and Mine for ZiftrCOINs

This article shows you how to install cpuminer-ziftr on a Linux distribution in order to mine ZiftrCOINs with a CPU.

Tested on Xubuntu 14.04.4 64 bit.

Requirements:-

  • A ZiftrCOIN-Qt Wallet installed on either a Windows PC, Linux  operating system or Mac.
  • A ZiftrCOIN receiving address.
  • A computer running a Linux distribution of your choice.

1. Open up a terminal window.

In Linux open a new terminal window by pressing Ctrl + Alt + T on the keyboard.

2. Update your computer and install dependencies:

sudo apt-get update

sudo apt-get upgrade -y

sudo apt-get install -y git curl unzip gedit automake autoconf dh-autoreconf build-essential pkg-config openssh-server screen libtool libcurl4-openssl-dev libtool libncurses5-dev libudev-dev

3. Visit the Github Repo: https://github.com/ZiftrCOIN/cpuminer-ziftr taking particular note of any build instructions that are required.

4. Download CPUMiner for ZiftrCOIN by cloning the repository.

Click the icon circled in red to copy the exact address of the CPUMiner ZiftrCOIN repository to your clipboard.

Grab the GitHub Address

Grab the GitHub Address

The address at the time of writing is shown below in red and you may need to replace this with the contents of your clipboard if this has changed by the time of reading.

cd ~

git clone https://github.com/ZiftrCOIN/cpuminer-ziftr.git

5. Check the CPUMiner Ziftr folder name.

List the contents of your home directory by typing:

ls -l

Locate the cpuminer-ziftr folder, taking note of its name.

cpuminer-ziftr Folder Name

cpuminer-ziftr Folder Name

If it differs from the one shown in red in the next command, make the appropriate change in step5.

5. Compile, make and install CPUMiner for ZiftrCOIN mining:

cd ~/cpuminer-ziftr

chmod +x autogen.sh

./autogen.sh

Now check the build instructions on the git repo page (as described in step 3). You need to look for the Linux configuration details to configure CPUMiner for ZiftrCOIN:

CpuMiner ZiftrCOIN configuration details on GitHub

CpuMiner ZiftrCOIN configuration details on GitHub

In this case:

./configure CFLAGS="-O3"

make

Finally, complete the installation with:

sudo make install

6. How to mine with CPUMiner-ZiftrCOIN in Linux.

At this point it is now possible to start mining for ZiftrCOINs with cpuminer.

Enter the cpuminer-ziftr folder:

cd ~/cpuminer-ziftr

For help using CPUMiner-ZiftrCOIN, type:

./minerd -h

The options for CPUMiner will be displayed.

CPUMiner ZiftrCOIN | minerd -h

CPUMiner ZiftrCOIN | minerd -h

To start mining for ZiftrCOINs straight away, type the following command to begin pool mining at ziftrpool.io, replacing the red prompt with your ZiftrCOIN Wallet receiving address.

./minerd -a ziftr -o stratum+tcp://ziftrpool.io:3032 -u <your Ziftrcoin wallet receiving address> -p x

ziftrpool.io | ZiftrCOIN mining pool

ziftrpool.io | ZiftrCOIN mining pool

You can, of course, modify this command to mine wherever you like.

7. Where can I find my Ziftrcoin Wallet receiving  address?

Open your ZiftrCOIN wallet, and click File > Receiving addresses…

Your receiving address(es) will be shown in the table.

If you are setting up multiple mining rigs, you may find it beneficial to create new receiving addresses in your ZiftrCOIN wallet for each of your machines and the type of mining resources employed.

For example, a second machine running Linux, mining with the cpu and gpu could have separate ZiftrCOIN receiving addresses from your main Windows mining rig. That way, when the virtual ZiftrCOINS come rolling in, you’ll know exactly where they have come from . This will assist in monitoring the effectiveness of each mining machine and its components.

8. Create a batch file to start CPUMiner and mine for ZiftrCOIN.

Creating a batch file simply automates  step 6. Typing just one command will start CPUMiner mining for ZiftrCOINs.

The name shown in blue will be the command to type that will start the cpu mining process. Make this something memorable.

cd ~

gedit ziftrcpu

In the window that opens, copy the following commands to it, making sure to correct / replace anything shown in color if needed.

#!/bin/bash

cd ~/cpuminer-ziftr

./minerd -a ziftr -o stratum+tcp://ziftrpool.io:3032 -u <your Ziftrcoin wallet receiving address> -p x

Click Save and exit the editor.

Now make the batch script executable:

chmod +x ziftrcpu

Running the batch script is easy. Just make sure that you are in your home folder

cd ~

A listing of that directory shows you batch file in green:

ls -l

Mining batch script

Mining batch script

To run it, just type it’s name preceded with a dot and a forward slash.

./ziftrcpu

To terminate the batch script, press Ctrl + C.

9. Install SSH for remote login.

If you wish to log into your Linux computer remotely,  install the open ssh server:

sudo apt-get install openssh-server byobu

Then log in to it using ssh from another Linux machine or PuTTY from your Windows PC.


ZiftrCOIN Donations: ZY3NkLnWSbpWwXi5fN3P6h1k6ZRWrUaWJu

Corsair PSU Electrical Buzzing Noise Under Load

Power Supply Coil Whine

This article demonstrates one type of electrical buzzing noise (coil whine)  that computer power supplies can generate under load. In this case, the unwanted noise comes from a Corsair HX100i Platinum PSU – a supposed premium product and chosen for a  silent PC build because of its Zero RPM fan mode and its promised quiet and efficient operation.

Power Supply Units (PSUs) should not sound like this. This one was sent back for an exchange and the replacement was good.


During general desktop use, the power supply was silent.  When required to fulfill demanding power requirements though, the PSU started to make a buzzing sound  like sparks jumping the gap of a Van de Graaff generator and in some instances, like chirping crickets.

It was difficult to determine the power supply as the source of these noises when it was in  situ within the PC case. Noise from cooling fans and spinning hard disk drives can make the noisy culprit difficult to determine by putting your ear inside the computer case. The only way I could make a determination was to remove the power supply from the case and place a demanding load on the PSU. This made it much easier to identify the noise source.

I used the Furmark GPU stress test to make the power demand.

This video demonstrates the electrical buzzing noise from the Corsair HX1000i power supply when put under load and how the noise stops when that demand is removed.

As per Corsair’s recommendations for curing noisy PSUs, all power saving options were disabled on the motherboard and in Windows prior to recording.


  • 02 seconds  : mouse click to start the Furmark GPU stress test. Straight away, the unwanted PSU buzzing noise can be heard.
  • 12 seconds : this is the noise from the GPU fan. However, the electrical noise from the Corsair PSU can still be heard.
  • 24 seconds : mouse click to end the Furmark GPU stress test. The PSU noise and the GPU fan both stop.
  • 29 seconds : the Furmark GPU stress test is repeated and the Corsair power supply noise can heard after the mouse click.
  • 48 seconds : Corsair power supply details shown during the Furmark GPU stress test. Power draw 187W in and 172W out.
  • 59 seconds: Furmark GPU stress test ends and PSU noise stops.

Set Up OpenELEC with TBS Drivers and Tvheadend

How To Set Up OpenELEC with TBS Drivers and Tvheadend

This guide shows you how to upgrade an existing OpenELEC Media Center system with the TBS drivers for Turbosight DVB tuner cards. It then explains how to configure your tuner card to scan for channels so that live TV becomes possible in Kodi by using the tvheadend back end and client add ons.

I have spent an inordinate amount of time testing various OpenELEC images and tailored upgrades and I have finally settled with a system that I now use daily. However, I encountered so many problems in achieving a usable system that I thought it was worthwhile writing down the solutions to help others working on similar projects.

My OpenELEC Media Center:

Dell Studio 540S; 6GB RAM, ASUS 1GB GeForce GT430 and a Turbosight TBS 6280 Dual DVB-T2 tuner card.

Official OpenELEC distro: [Beta] OpenELEC 5.95.1 (x86_64) | Generic 64 bit Build

TBS Driver upgrade image: 6.0 Beta 1 | OpenELEC-Generic.x86_64-6.0.b1-TBS-1.0.tar

Main features: Kodi 15.0 Isengard Beta 1; Video Skip Steps (skip backwards and forwards); remote Power button Suspends and Wakes the machine; serves as a digital video recorder, waking to record and suspending when complete. It’s reliable and boots from cold quickly.

What You Will Need

TBS 6280 Dual DVB-T2 Card Installed

TBS 6280 Dual DVB-T2 Card Installed

  • A Turbosight DVB tuner card installed in your target computer.
  • The computer running the OpenELEC system needs to be connected to your home network, either with a wired ethernet cable or a wireless connection.
  • A second computer, connected to the same network, will be used to connect to the OpenELEC system using the Secure Shell (SSH) network protocol. Linux-based operating systems like Ubuntu and Mint have this tool as standard. If your second computer is running Windows, then download the free telnet and ssh client,  PuTTY to do the same tasks. This computer will also be used to connect to the tvheadend back end with a web browser to allow configuration of the TV server.

The Procedure

  1. Download and then install an official OpenELEC distro on your target system.
  2. Download a compatible upgrade image that contains the TBS DVB drivers. Copy this to your OpenELEC system and upgrade.
  3. Set up tvheadend in Kodi.
  4. Configure tvheadend via the web browser graphical user interface (gui). This includes transmitter selection, scanning for channels and channel mapping.
  5. Instruct Kodi to unload TBS DVB drivers during Suspend. This prevents the loss of tuner functionality when Kodi is woken from sleep.

1. Selection of Official OpenELEC Distros

OpenELEC Download

OpenELEC Download

Visit OpenELEC.tv and navigate to the download page and make your decision on either a 32 or 64 bit operating system.

Nvidia Legacy Builds

Notice the Nvidia Legacy builds that cater for older Nvidia cards. One of my first builds was based on this initial distro because my Nvidia GT430 card was listed as supported. It certainly was, but I found by experimentation that my old GeForce card was also supported in the latest OpenELEC distro too.

My advice then is to try the latest version of the OpenELEC distro. If you find that your card is not supported, then restart your project with one of the Nvidia Legacy builds.  After all, each release is only ~140Mb and the installation time from USB stick, minimal.

My choice: [Beta] OpenELEC 5.95.1 (x86_64) | Generic 64 bit Build

Openelec Installation Guide

OpenELEC Installation Guide

Once you have your downloaded image, visit the OpenELEC wiki installation instructions and install.

Enable SSH Server During the Installation of OpenELEC

Enable SSH Server During the Installation of OpenELEC

During installation, ensure that you Enable SSH server per default and select Configure SSH and Samba Services in the Kodi set up wizard.

OpenELEC Kodi Configure Services

OpenELEC Kodi Configure SSH and Samba Services

2. How to Apply OpenELEC Upgrades

2.1 Obtain an OpenELEC image with TBS DVB drivers

Kudos to CvH on the OpenELEC forums for providing these images for download and to the people who spent time creating them. Visit:

http://openelec.tv/forum/83-dvb-s-s2-support/70750-oe-5-0-6-0-images-for-additional-dvb-drivers

then use either Dropbox, OneDrive or the FTP Mirror to download a suitable image containing the drivers for your card.

My choice: 6.0 Beta 1 | OpenELEC-Generic.x86_64-6.0.b1-TBS-1.0.tar

6.0 Beta 1 - OpenELEC TBS DVB Image

6.0 Beta 1 – OpenELEC TBS DVB Image

2.2 Upgrade OpenELEC with TBS DVB drivers

Boot your OpenELEC system, ensuring it is connected to your home network.

On another computer, open your file manager and navigate to the OpenELEC Update folder, which can be found via a Windows network share:-

Network > Windows Network > Workgroup > OpenELEC > Update

Navigate to the Openelec Update Folder

Navigate to the OpenELEC Update Folder

Enter the Update folder and you should find it empty.

Copy the upgrade (.tar) image from your computer to this folder. When the copy process is complete, reboot your OpenELEC system by rebooting Kodi.

When the system reboots, pay attention to the top left of the screen. You should see:

Found new .tar archive. extracting…

The OpenELEC system will reboot automatically when the update has been completed.

Upon reboot, check that your graphics card hardware is still supported after the upgrade. Navigate to:

System > System Info > Video

3. How to Set Up Tvheadend on OpenELEC Media Center

Note: Many problems encountered during the set up and configuration of tvheadend can be resolved easily by a simple reboot of Kodi and your OpenELEC system. Sometimes, the changes you make are not recognized until the next reboot.

3.1 Install the tvheadend backend service

From the Kodi main menu, navigate:

System > Addons > Get Addons (or Install from Repository) > OpenELECMediacenter OS Add-ons > Add-on repository > UnofficialOpenELEC(Generic/x86_64) Add-ons

Install the  UnofficialOpenELEC(Generic/x86_64) Add-on repository.

Go back x3 to update the repository, then:-

Get Add-ons (or Install from Repository) > UnofficialOpenELEC(Generic/x86_64) Add-ons > Services > tvheadend

Install

Enter the tvheadend service Configuration and select the DVB tab.

Enable Wait for frontend initialization and chose the Number of adapters to wait for

Click OK

3.2 Install the tvheadend client

Go back x3

Disabled Add-ons (or My Add-ons) > PVR clients > Tvheadend HTSP Client

Click Enable.

Return to the Kodi Settings menu.

3.3 Enable Live Tv

Navigate to:-

Settings > TV > General

and click Enabled.

Return to the Kodi main menu.

IMPORTANT: Reboot your OpenELEC system

4.  How to Configure tvheadend

4.1 How to access the tvheadend web configuration page

On your other computer, launch a web browser and type the IP address of your OpenELEC machine into the web browser’s address bar with the port suffix used by tvheadend:-

192.168.x.xxx:9981

This should display the graphical user interface configuration page for tvheadend.

If you are unsure of your OpenELEC system’s IP address, find it in Kodi by navigating to:

System > System Info > Network

Tvheadend Web GUI

Tvheadend Web GUI

If the tvheadend web page fails to show or asks for a user name and password on the first attempt, then on a Linux machine, open up a terminal window by pressing Ctrl + Alt + T (use PuTTY if you have a Windows operating system).

Use a Secure Shell  (SSH) to login as the root on your OpenELEC system. Type:-

ssh root@192.168.x.xxx

The password is:-

openelec

at this point you have access to your OpenELEC system and have  full ability to manage the file system. A list of useful SSH commands can be found here if you need to do something else.

Type:-

tvheadend -C

and press enter. Go back to your web browser and try to access the tvheadend configuration page once more. If this fails, reboot your OpenELEC system and try again.

4.2 Create a tvheadend user account

Configuration > Access Entries > Add

and create a user account with complete access to everything.

Tvheadend Login Account

Tvheadend Login Account

The default account, without a user name or password can then be deleted to secure your system.

Login with your newly created account.

4.3 How to configure tvheadend to scan for channels

On the tvheadend web page, navigate to:

Configuration > DVB Inputs > TV Adapters

tvheadend | Configuration > DVB Inputs > TV adapters

tvheadend | Configuration > DVB Inputs > TV adapters

Check that your tuner card details are displaying the correct driver details. If they do not appear or are incorrect, then search for another update image that may contain the drivers for your card and try again from Step 2.

If all is well, then the first step in this process is to configure the network type.

Networks tab > Add

Networks

tvheadend | Networks

Select the network type from the drop-down list. Either IPTV, ATSC, DVB-S, DVB-C or DVB-T Network.

Give the network a name (“Freeview” in my example) and select the transmitter from which you receive your broadcast. If yours is not represented, try one of the generic ones at the top of the list like Generic auto default.

Tvheadend DVB-T Configuration for Freeview

Tvheadend DVB-T Configuration for Freeview

My example shows a typical DVB-T Freeview set up for the Mendip transmitter in Bristol.

Click Create to complete the network set up.

Now click on the TV adapters tab then the first of your tuners.

Enable the tuner and rename it if you so wish.

At the Networks drop-down menu, select the network that you created in the previous step (“Freeview” in my example).

Select any other options that your tuner supports and when done, click Save.

Repeat this process if you have more than one tuner.

Tvheadend TBS Tuner Configuration

Tvheadend TBS Tuner Configuration

Now, go back to the Networks tab and wait for the #Services (channels) to be found. There is no requirement to press any sort of scan button. As soon as the network and tuners are configured, tvheadend will begin to scan for channels.

Tvheadend can take a few minutes to complete the scan. Initially, #Muxes will be equal to Scan Q Length.

Tvheadend Start of Channel Scan | #Muxes = Scan Q Length

Tvheadend Start of Channel Scan | #Muxes = Scan Q Length

As each of the pre-defined muxes are scanned, Scan Q Length will decrease accordingly. The channel scan will have finished when Scan Q Length reaches zero.

Tvheadend Channel Scan Progressing | Scan Q Length Total Decreasing and #Services Increasing

Tvheadend Channel Scan Progressing | Scan Q Length Total Decreasing and #Services Increasing

Tvheadend Channel Scan Successful

Tvheadend Channel Scan Successful

If, at the end of the scan, no channels have been found, then edit your network profile and change Pre-defined Muxes to Generic-auto-default and try again. Press Force Scan to initiate this.

4.4 Map services in tvheadend

When tvheadend has completed a successful scan and has returned a good number of services, the next step is to map those services to channels.

Configuration > DVB Inputs > Services > Map All

tvheadend | Map all (Services to Channels)

tvheadend | Map All (Services to Channels)

Make the following selections and then click the Map  button to map services to tv channels.

tvheadend | Map All Selections

tvheadend | Map Services

  • Check availability – if you select this option, services that are not currently transmitting will be omitted.
  • Include encrypted services – self explanatory.
  • Merge same name – prevents channel name duplication.
  • Create provider tags – produces useful tags that Kodi can use to filter tv channels; for example, SDTV and HDTV. It’s beneficial to select this option.

The mapping process should be completed quickly in a matter of seconds. And when complete, TV will appear in the Kodi menu.

5. How to unload OpenELEC DVB drivers for suspend

Depending on your tuner card and the TBS drivers chosen, a condition may exist where the tuner card(s) cannot be accessed after the computer has been suspended and then woken. This problem spoils the whole installation and means that the system cannot be used reliably as a digital video recorder.

To circumvent this problem it is necessary to force the DVB driver modules to unload during the Suspend operation.

Reboot your OpenELEC system and ensure that you are able to play TV channels to demonstrate that the tuner drivers are loaded and running.

Use a Secure Shell (SSH) to log into your OpenELEC system as described in step 4.1, and having logged in as root, type:-

lsmod

and press Enter. This command will list and detail the kernel modules that are currently loaded.

lsmod | OpenELEC

lsmod | OpenELEC

Look down the list and take note of the module name that is clearly associated with your tuner. In this case, the module name is:-

saa716x_tbs_dvb

Go to your OpenELEC system and using Kodi, navigate to the tvheadend back end service add on. Click configure and choose the DVB tab.

Settings - Tvheadend | DVB

Add the module name to the field entitled Unload DVB modules before suspend and click OK.

A notice that Kodi is Working and unloading the DVB drivers will be seen when Suspend is now initiated. The drivers will be re-loaded upon resume.

6. Other Aspects to Try

Once you have your OpenELEC machine running reliably, you may want to consider exploring the following to improve your system.

  • Tvheadend – Timeshifting with available RAM.
  • Configuring Kodi Power Management to Suspend your machine after so many minutes of inactivity.
  • Recording time offsets so that you don’t miss the beginning or end of your favourite shows.
  • Adding TV logos to your TV channels.