How to Install VirtualBox in Ubuntu
This step-by-step detailed guide illustrates the way to install VirtualBox in Ubuntu and then install Windows 7 within a virtual machine to run seamlessly with the Ubuntu desktop. This allows software designed for Windows to run alongside Linux-based programs.
The main benefits of this – over having a dual booting system – are speed and convenience. You won’t have to wait for either operating system to shutdown before you boot into the other, nor will you have to save and close down work before re-boots.
Steps Covered:
- How to install VirtualBox in Ubuntu.
- How to create a virtual machine with VirtualBox and install Windows 7.
- How to install Windows Guest Additions CD Image.
- How to integrate Ubuntu and Windows 7 desktops, seamlessly.
- How to share files and folders between Windows 7 and Ubuntu in VirtualBox.
- How to install software on the virtual machine.
- Adobe Lightroom running in Ubuntu via seamless integration with a Windows 7 virtual machine.
Requirements:
- A reasonable PC.
- An Ubuntu operating system.
- A Windows 7 installation ISO file and activation key (1). Remember! A 64 bit version is best for computers that contain more than 3GB RAM.
- Ample hard disk space to accommodate a new operating system.
- Plenty of time and no distractions.
(1) – Almost any operating system can be installed within a virtual machine, provided you are able to obtain the correct ISO file. This guide details the installation of Windows 7 (64 bit).
Terminology: The Difference Between Host and Guest Operating Systems.
The host operating system is the operating system on which you install VirtualBox. In this case, Ubuntu. And Ubuntu will host the guest operating system, Windows 7.
1. How To Install VirtualBox in Ubuntu
1.1 Select the Ubuntu Software Centre Icon and in the search field, type virtualbox.
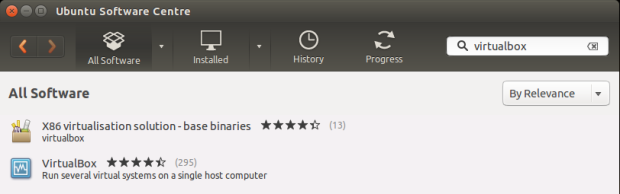
Ubuntu Software Centre | VirtualBox
1.2 Select VirtualBox (Run several virtual systems on a single computer) and then click Install. You may need to enter your administrator password.

Ubuntu | VirtualBox Install
1.3 Once installed, close the Ubuntu Software Centre.
1.4 Click the Ubuntu Unity ‘Start’ icon and type virtualbox in the search bar. Select VirtualBox to run it. The Oracle VM VirtualBox Manager window will open.

Oracle VM VirtualBox Manager
2. How To Install Windows 7 in VirtualBox
2.1 Open the Oracle VM VirtualBox Manager as described in step 1.4, then select New.
2.2 In the Name field, enter a description that best describes your virtual machine and guest operating system. If you specify what your guest operating system actually is, the Type and Version fields alter to match automatically. If they do not, ensure that you select the correct type and version before proceeding and clicking Next.
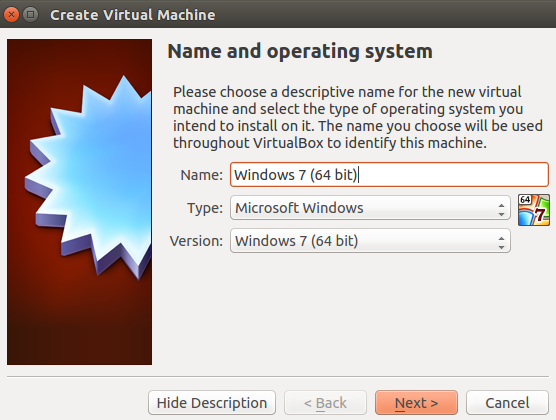
VirtualBox | Configuration for Windows 7 (64 bit)
2.3 Move the slider to select the amount of memory (RAM) you want to allocate to your guest operating system. The more RAM you make available the better, but be careful not to starve your host operating system of memory.
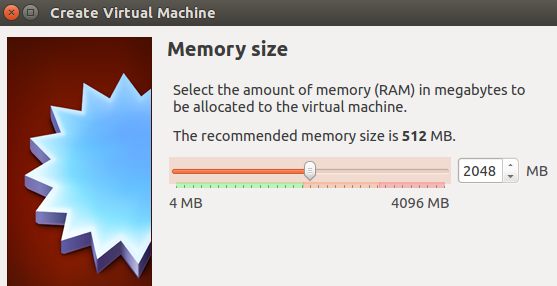
VirtualBox Memory Allocation for Guest Operating System
2.4 Create a virtual hard drive now.

Create a Virtual Hard Drive Now | VirtualBox
2.5 Choose the VDI (VirtualBox Disk Image).
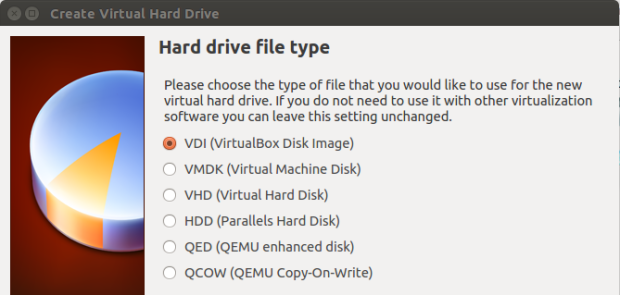
Create a VDI (VirtualBox Disk Image)
2.6 Select Dynamically allocated.

Storage on Physical Hard Drive | Select Dynamically Allocated
2.7 Choose a reasonable amount of storage space for your guest operating system. Take into account the space needed for the operating system itself and the size of the programs you wish to install on it. Since we have opted for Dynamically allocated disk space in step 2.6, the size of the virtual hard drive will grow as more data is written to it, up to the maximum specified here. This maximum cannot be altered later, so chose wisely.
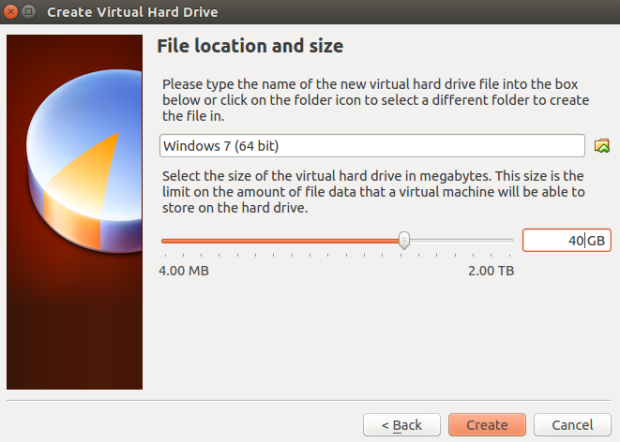
VirtualBox Hard Drive Size
2.8 Click the Create button to complete the main configuration of your virtual drive.
2.9 Your new virtual machine will be shown in the Oracle VM Manager. Right click that drive and select Settings…

Right Click New Virtual Drive and Select Settings
2.10 If you see a warning triangle and Invalid Settings Detected then click the warning box to address the highlighted issues.
2.11 Go to System and select the Processor tab. If your computer has multiple CPU cores, you can stipulate here how many cores will be dedicated to your virtual machine and guest operating system.
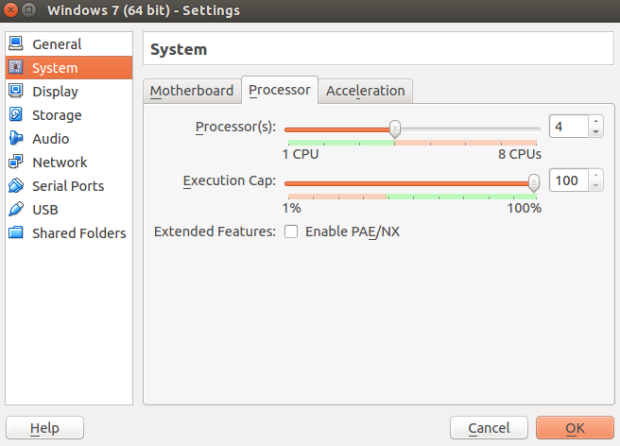
VirtualBox | Select the Number of CPU Dies for your Virtual Machine
2.12 Select Storage and the Empty CD icon beneath Storage Tree. Under Attributes, select the CD/DVD Drive location icon and select Chose a virtual CD/DVD disk file…

Select your Windows Operating System ISO File
Navigate to your Windows installation ISO file and Open it. The ISO file will then be shown underneath the Controller: IDE. Click OK. Effectively, this step inserts your Windows installation disk into your virtual machine. Your virtual machine will boot from this when it is first switched on.
2.13 You are now ready to start your virtual guest machine for the first time. Click Start.
2.14 If you receive an error regarding VT -x/AMD-V, it means that you do not have that type of hardware acceleration enabled in your BIOS. At this point you will need to re-boot your computer and enter the BIOS system to enable it. Not all BIOS systems are the same. You will need to look for this setting. It is generally found under the Performance or Virtual Machine Monitor headings.

BIOS Virtualization | Dell System XPS420
2.15 When your virtual machine runs for the first time, it will begin to install the operating system that you specified in step 2.12.
Ensure you select Custom (advanced).

Installation of Windows 7 (64 bit) in VirtualBox
And then select the unallocated space you created as a virtual drive.

Unallocated Space for Windows Installation | VirtualBox
2.16 Install your Windows operating system.
3. How To Install Windows Guest Additions
3.1 With the guest operating system installed and booted to the Windows desktop, maximize the VirtualBox window to make it full screen. Notice that the Windows environment does not rescale when you do this. We need to install something called Guest Additions in the Windows system to enable this. Hover the mouse pointer over the top menu bar to reveal the VirtualBox menu. Select Devices > Insert Guest Additions CD Image…
VirtualBox will check your host system to see if you already have the appropriate Guest Additions CD Image downloaded for your guest operating system. If it cannot be found you will be prompted to download it. Click Download.

VirtualBox Guest Additions Download Prompt
And then confirm the download.

VirtualBox Guest Additions Confirm Download Confirmation
3.2 When the Guest Additions CD Image has been downloaded, you will be asked: “Do you wish to register this disk image file and insert it into the virtual CD/DVD drive?”.
Click Insert.

Register & Insert Guest Additions CD Image File
The Guest Addition CD Image is then made accessible through the Windows virtual CD drive. Navigate to Windows START > Computer to view in Windows explorer.

VirtualBox Guest Additions | Windows Virtual CD Drive
3.3 Double-click the CD Drive (D:) VirtualBox Guest Additions icon and launch the VBoxWindowsAdditions application by double-clicking it. Hit Yes when asked, “Do you want to allow the following program to make changes to this computer?”

Oracle VM Virtual Box Guest Additions Setup Wizard
3.4 Work through the installation process by clicking Next and Install if asked for permission to install device software. Re-boot the guest operating system when prompted to do so.
4. How To Integrate Windows 7 and Ubuntu Desktops
4.1 When the guest operating system re-boots, you should notice that resizing the VirtualBox window also resizes the Windows desktop too. This demonstrates that the Windows Guest Additions are working properly.
4.2 To integrate the guest environment with the host operating system (i.e. integrate Windows 7 with Ubuntu, seamlessly), hover your mouse over the top menu bar to reveal the VirtualBox menu and select View > Switch to seamless mode. To switch back, move your mouse to the bottom centre of the screen to access the guest operating system menu.
Alternatively, you can use the quick-key combination of host-key + L to enable and disable seamless mode. The host-key default is the right control key. Right Ctrl + L.
Seamless integration means that the Windows task bar is accessible at the bottom of the Ubuntu desktop and both Linux and Windows programs can be run side by side.

Seamless Integration of Windows 7 with Ubuntu | VirtualBox
5. How To Share Files and Folders with VirtualBox
5.1 The installation of Windows Guest Additions should allow drag and drop functionality between the host and guest operating systems, either one way or bidirectionally. By default, this function is disabled. In the VirtualBox menu, select Devices > Drag’n’Drop > and your direction preference.
5.2 The clipboard can also be shared between host and guest operating systems in a similar manner. Select Devices > Shared Clipboard > and your direction preference.
5.3 Devices > Shared Folders Settings… allows the sharing of host folders with the guest operating system in order that files can be shared between them.

VirtualBox | Shared Folders
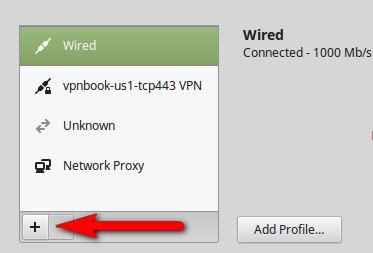
To add a new folder for sharing, click the add folder icon on the right. At the drop down menu entitled Folder Path, select Other… then navigate to your designated folder and click Open.
Before adding the share, you are given the opportunity to provide a name for the shared folder, make it read-only and auto-mount it. Tick Auto-mount then OK. Click OK to exit the settings menu.
5.4 Shared folders are shown as network shares in the guest operating system.

Network Shares | VirtualBox
In Windows 7, START > Computer > Network > VBOXSVR to access your shared folders.
6. How To Install Software on the Virtual Machine
To install software on your guest operating system you have a number of options:-
- Use the browser of the guest operating system to download the software and install it from the appropriate download folder.
- Make an ISO file of the installation CD/DVD and have that available in a shared folder on the host operating system as described in step 5.3.
- Make an ISO file of the installation CD/DVD and mount that in the same manner as described in step 2.12.
- Enable Drag’n’Drop and move files accordingly.
- Use the Shared Clipboard to Copy files from the host to the guest operating system.
7. Adobe Lightroom Running in Ubuntu via Seamless Integration with a Windows 7 Virtual Machine

Adobe Lightroom Running in Ubuntu | VirtualBox
Once your virtual machine is running with folder shares, it is quite easy to start testing various types of software.
See Adobe Lightroom 6 working in Ubuntu.
To get Adobe Lightroom installed I shared two folders with the virtual machine; one that contained the installation files and a second that contained my photographs. I installed Lightroom from the Network Share described in step 5.4.
Photographs were imported into Lightroom’s Library by adding the second Network Share to Folders.


You must be logged in to post a comment.