android

Block Spam SMS With No Number

‘Block’ Spam SMS With No Number

Spam text messages without number | How to block messages without number | How to block sms without number | Spam text with no number | How to block sms without number in Samsung | sms no number | How to block spam sms with a name not number

This article describes how to ‘block’ spam SMS text messages that have a name instead of a number and is specific to smartphones that use the Android operating system.

Without installing any third-party apps, this guide shows the steps taken on a Samsung S8 smartphone to ‘block’ spam SMS messages that have no number, by constructing a filter to identify and capture them.

Samsung S8

It replaces an older article written for the Samsung S3 mobile phone: How To Block Text Message SMS Spam on Samsung Galaxy Phones (Android)


Smartphones that run on an Android operating system are capable of diverting spam SMS text messages to a spam folder, even if the telephone number is absent from the message or the telephone number has been replaced with a name. Although these messages are still received by your handset, the method of identifying and diverting spam in this way creates the illusion that the nuisance message has indeed been blocked.

To ‘block’ spam SMS text messages that have a name instead of a number, follow these simple steps:-

STEP 1: Open the Samsung Messages app.

Samsung S8 Messages App

STEP 2: Identify the spam SMS text message and tap it.

Identify Spam SMS


STEP 3: Take note of the keywords or phrases that are in every message received.

SPAM SMS Message – Note the Keywords

In this example, I use the name of the sender, LloydsBank and the word ENTRIES.

STEP 4: Go back to your list of messages by pressing the back arrow, top left.

STEP 5: Open message options by tapping the three dots at the top right of the screen

Message Options

STEP 6: From the options that appear, tap Settings.

STEP 7: Tap Block messages

Block messages

STEP 8: Tap Block phrases – Manage the phrases that will cause incoming messages to be blocked.

Block phrases

STEP 9: Enter the keywords or phrases noted in step 3.

Block keywords and phrases

Type a keyword or phrase then tap the plus (+) symbol to add it to the list. Remove a keyword or phrase by tapping the minus (-) symbol associated with that text.

As soon as a keyword or phrase is entered, then any new SMS message that contains that text will be diverted to the Blocked messages folder and effectively ‘blocked’.

It is important to note that:-

  • phrase matching is not case sensitive and all text entries are stored in lower case.
  • if a genuine SMS text message contains one of your chosen keywords or phrases, then that message will be ‘blocked’ too. It is therefore important to choose your keywords and phrases carefully.

STEP 10: You’re done!

Return to the Messages main list by tapping the back arrows on each of the option screens.

How to check Blocked messages

Once you have your keywords and phrases in place, it is worth checking your spam SMS folder occasionally to check its effectiveness.

Blocked messages

The Blocked messages list can be accessed from the Messages main conversation screen by tapping the three dots, top right, and selecting:-

Settings > Block messages > Blocked messages

Samsung Wireless Chargers

Review: ZD V Full Vibration Feedback 2.4G Wireless Controller Gamepad Joystick For PC, Playstation 3, Android and Steam

ZD V Full Vibration Feedback 2.4GHz Wireless Controller Gamepad Joystick for PC (Windows XP/7/8/8.1/10), the PlayStation 3, Android devices and Steam.

For the sake of clarity, this is a review of the ZD V Full Vibration Feedback 2.4GHz Wireless Controller Gamepad Joystick for PC (Windows XP/7/8/8.1/10), the PlayStation 3, Android devices and Steam. It was purchased with hard-earned cash, so this review reflects that in terms of value for money.

The controller was purchased to compliment a RetroPie set-up and for occasional use with games on Steam.


The ZD V Full Vibration Feedback 2.4GHz Wireless Controller Gamepad Joystick is designed and manufactured by Dongguan Zhi Dong Electronic Technology Co. Ltd. in China. They are Amazon Marketplace Sellers and offer an incredible piece of gaming hardware for the money. A wired version of this model is also available with the same features as the wireless one. Both controllers are Plug and Play and PC fully compatible. They both contain a 360 core, which means that they are recognized as XBOX 360 controllers.

Check prices on amazon.co.uk:-

ZD V Full Vibration Feedback WIRELESS Controller Gamepad Joystick


ZD V Full Vibration Feedback WIRED Controller Gamepad Joystick


Packaging

The ZD V Full Feedback wireless controller arrives quickly and is packaged in a brown cardboard box when ordered from Amazon. Inside is the blue cardboard box that houses the wireless controller and its accessories.

Packaging: ZD V Full Vibration Feedback Wireless Controller Gamepad Joystick

Packaging: ZD V Full Vibration Feedback Wireless Controller Gamepad Joystick

Two polystyrene inserts protect the ZD V wireless controller during shipping. You will find the controller in a plastic bag (not shown) for additional protection. The palm grips of the controller are protected further with easy-to-remove plastic film.

Inside the Box: ZD V Full Vibration Feedback Wireless Controller Gamepad Joystick

Inside the Box: ZD V Full Vibration Feedback Wireless Controller Gamepad Joystick

Inside the box are the ZD V Full Vibration Feedback 2.4 GHz Wireless Controller GamePad Joystick itself and  a second bag containing a 2.4GHz USB dongle; a USB to micro USB cable; a USB to micro USB adapter to enable connection to Android devices, and a folded piece of paper containing the operating instructions, product specifications and manufacturer details.

Contents: ZD V Full Vibration Feedback Wireless Controller Gamepad Joystick

Contents: ZD V Full Vibration Feedback Wireless Controller Gamepad Joystick

Manufacturer Details & Product Specifications:

  • Dongguan Zhi Dong Electronic Technology Co. Ltd., China.
  • Model: ZD-V208
  • Product size: 156 x 105 x 65mm
  • Working modes: XInput / Direct Input / Android
  • Interface: USB 2.0 / 3.0
  • Product weight: 210g
  • Battery: Non-accessible, rechargeable polymer lithium battery.
ZD V Full Vibration Feedback Wireless Controller Gamepad Joystick

ZD V Full Vibration Feedback Wireless Controller Gamepad Joystick

Features & Operation

The ZD V Full Vibration Feedback 2.4GHz Wireless Controller Gamepad Joystick is equipped with the following buttons, triggers and joysticks:

Controls: ZD V Full Vibration Feedback Wireless Controller Gamepad Joystick

Controls: ZD V Full Vibration Feedback Wireless Controller Gamepad Joystick

Both the LEFT STICK and RIGHT STICK are stick buttons and can therefore be clicked: LSB and RSB.

The trigger buttons [LT & RT] feel like single click buttons. They are, in fact, pressure sensitive buttons that provide linear graduation through pressure sensing. This means that the harder you press them, the greater the input value sent to your game. This feature means that the gamepad can be used in conjunction with racing games that require progressive braking and acceleration, or shooting games, where a one click shot is all that is needed.

Shoulder and Trigger Buttons - ZD V Full Vibration Feedback Wireless Controller Gamepad Joystick

Shoulder and Trigger Buttons – ZD V Full Vibration Feedback Wireless Controller Gamepad Joystick

Integral Rechargeable Battery

A micro USB port, located in between the shoulder and trigger buttons, is used to charge the on-board lithium battery and connect the controller to an Android device. The battery can be charged by connecting the device to a suitable 5 volt power supply via the supplied USB cable. A computer USB port or mobile phone charger will suffice. A charging unit is not supplied with the product, presumably to keep the cost of the units low.

The ZD V Full Vibration Feedback 2.4 GHz Wireless Controller GamePad Joystick is shipped with the battery partially charged. The temptation is to start using the game controller straight out of the box without fully charging the battery. I encountered numerous problems when I did just this, problems that disappeared when the device was fully charged later.

Since the lithium battery is integral with the controller, this means that it cannot be changed easily.

Important points for consideration are these:-

  • If the battery runs flat during a gaming session, the battery cannot be replaced. Instead, you would have to connect the controller to a charger, which means that you are now tethered to your charger until the battery has sufficient juice for you to remove it.
  • Lithium batteries have a finite lifespan due to the repetitive cycle of power depletion and recharging. When the battery begins to fail to hold charge for a decent period of time, then changing it may be difficult and expensive.
Rear View: ZD V Full Vibration Feedback Wireless Controller Gamepad Joystick

Rear View: ZD V Full Vibration Feedback Wireless Controller Gamepad Joystick

After a full charge, the ZD V Full Vibration Feedback 2.4 GHz Wireless Controller GamePad Joystick battery power lasts for a considerable amount of time. On a full charge, the battery lasts between 8 and 15 hours of continuous game play. These figures are in line with the published specifications.

Connection

Connection to gaming hardware if relatively simple. Just insert the wireless USB dongle into a USB port of your gaming equipment and select the operation mode of the gamepad with the HOME button.

On a PC platform, the gamepad is Plug and Play – except for Windows XP. For use on Windows XP, you will need to download and install the 360 controller driver from Microsoft’s official website before plugging in the USB dongle.

PS3 and Android platforms are Plug & Play.

How to Turn the ZD V Full Vibration Feedback 2.4GHz Wireless Controller Gamepad Joystick ON and OFF

  • TURN ON: Press the HOME button.
  • TURN OFF: Long press the BACK & B buttons together. Alternatively, the gamepad will automatically turn off after a reasonable time of inactivity.

Mode and Indicator Light Status

Press the HOME button to cycle through the input modes compatible with your device. The  colour of  the indicator light specifies what mode the gamepad is in.

The indicator light will flash until it detects a suitable driver on your gaming system. The indicator light will then shine constantly. Modes can be forced by long holding the HOME button.

Input Modes: ZD V Full Vibration Feedback Wireless Controller Gamepad Joystick

Input Modes: ZD V Full Vibration Feedback Wireless Controller Gamepad Joystick

  • Use the XInput mode to enable the full vibration feedback feature. It is recommended for PC / XBOX360 games that have been written to provide vibration feedback.
  • Use the Direct Input mode for the PS3 and other platforms like the Raspberry Pi.
  • Use the Android mode when paired with an Android device.

Note: the full vibration feature will only work in XInput mode AND when the games have been written to support it.

Exchange D-PAD and LEFT STICK Functions

A great feature of this gamepad is that the D-PAD and LEFT STICK controls can be swapped easily, back and forth, by pressing BACK and the LEFT STICK BUTTON at the same time.

D-PAD LEFT STICK Exchange: ZD V Full Vibration Feedback Wireless Controller Gamepad Joystick

D-PAD LEFT STICK Exchange: ZD V Full Vibration Feedback Wireless Controller Gamepad Joystick

If you want to use the ZD V Full Vibration Feedback 2.4GHz Wireless Controller Gamepad Joystick with RetroPie on the Raspberry Pi, then this function is fantastic for choosing the optimal left thumb controller for a particular ROM, quickly.

Conclusion

The ZD V Full Vibration Feedback 2.4 GHz Wireless Controller GamePad Joystick is rich with useful features that make it a versatile gaming accessory. With its 360 core and its range of compatibility modes, it can be used in conjunction with many gaming platforms. And, being a wireless controller means that you will not be tethered to your gaming hardware and restricted in range as you would be with its wired counterpart.

This gamepad feels good in the hands of both adults and children. It has been designed and produced to a quality resembling that of a PS3 controller. The construction is good; the buttons respond well and the joysticks work with precision.

Positives:

  • A versatile wireless controller with a XBOX 360 core, resulting in cross-platform compatibility. Fully compatible with PC, PS3, Android and other devices using Direct Mode.
  • Full vibration feedback when used in conjunction with compatible games.
  • Integral battery with continuous play time of 8 to 15 hours.
  • JD-Switch: The ability to swap the D-PAD and LS controllers in-game.
  • LT & RT are pressure sensing switches. This means linear and precise control in racing games is possible, depending on how you press.
  • Very good build quality, resembling that of a PS3 controller.

Negatives:

  • The controller is made from black glossy plastic, which attracts fingerprints. Very easy to wipe clean though.

Buy:-

ZD V Full Vibration Feedback 2.4GHz WIRELESS Controller Gamepad Joystick

ZD V Full Vibration Feedback WIRED Controller Gamepad Joystick

How To Block Text Message SMS Spam

How To Block Text Message SMS SPAM on Samsung Galaxy Phones (Android)

If you’ve started receiving SPAM SMS text messages purporting to be from LloydsBank, Sky or elsewhere, and you cannot report them as SPAM because of the invalid number error, there is a workaround to divert these messages to your existing SMS SPAM box without installing SPAM-catching applications.

I will show you how, using the LloydsBank SPAM SMS text message that has been plaguing me for a while.

Block Spam SMS With No Number is an updated guide for the Samsung S8 smartphone.

LloydsBank SMS SPAM Text Message

The LloydsBank SPAM SMS text message appears something like this in your SMS Inbox.

SPAM SMS from LloydsBank

LloydsBank SPAM SMS Text Message

If you Press and Hold the text message to bring up the options associated with it, you have the option to Delete the thread or Register as spam number.

Android Text Message SMS SPAM | Register as spam number

Register as spam number

Registering text messages as SPAM usually works to divert subsequent messages to your SPAM folder. Unfortunately though, spammers have become crafty and use alphanumeric strings or numbers that are too long to be recognized as telephone numbers in their transmissions. This results in the invalid number error when trying to register a number as SPAM. This means that marking that text as SPAM fails and you will continue to receive them in your SMS inbox.

How To Block Text Message SMS SPAM with Invalid Number Error

Open up a thread of the offending SPAM messages to identify a recurring keyword. In the example of the LloydsBank SPAM SMS, there are a few, namely;

  • A/C
  • Bal
  • CR
  • DR
  • Entries
Keywords in the LloydsBank SPAM SMS Text Message

LloydsBank SPAM SMS Text Message Thread

Return to your SMS text message Inbox and press the Menu button on your device.

Android Menu Button

Android Menu Button | Often Found On The Phone Itself (Bottom Left) Rather Than The Screen

This will display many options associated with your SMS text messages. Select Settings at the bottom of the list.

Android Text Message Option List

Select Settings From the Text Message SMS Options List

Scroll all the way to very bottom of the Settings page. Ensure the Spam settings option is ticked. Then, select Register phrase as spam.

Tip! You can also tick Block unknown senders so that you only receive SMS text messages from people on your contact list.

Spam Message Options - Android

Select Register phrase as spam & Ensure that the Spam settings Option is Ticked

Click the plus + icon to add one of the recurring phrases that you noted earlier. Then click Save.

Android SPAM SMS Text Message Keywords and Phrases to Block

SPAM Keywords and Phrases to Block

To block the LloydsBank SPAM SMS text message, I have used the word entries, but I could have used any of the others identified earlier.

It is important to note that:

  • phrase and word matches are not case sensitive
  • a genuine SMS text message could be diverted to your SPAM folder if it contains one of your entered words or phrases. So choose wisely.

Once you have set-up phrase blocking, it is worth checking your SPAM SMS folder occasionally to check it’s effectiveness. It can be accessed from your SMS text message Inbox screen and by pressing your device’s Menu button, then selecting SPAM messages.

Find MAC Address of Samsung Galaxy Devices

How To Find The Wi-Fi MAC Address Of A Samsung Galaxy Phone And Samsung Galaxy 10.1 Tab

Samsung Galaxy S2, S3, S4, S5, S6, S7, S8, S8 Plus and Samsung Galaxy 10.1 Tab

This guide shows you where to find the Wi-Fi MAC address in an Android operating system, common to Samsung Galaxy mobile phones and the Samsung 10.1 TAB tablet.

The screenshots are taken from a Samsung Galaxy S3 and the instructions are based on this model. However, this method will be very similar on most versions and releases of Android and Samsung mobile devices.

How To Obtain the MAC Address Of A Samsung Galaxy Device

Step 1: Access the Settings Screen

Swipe your finger down from the top of your phone’s screen to access the quick options page.

Then press the settings icon. The cog icon, shown top right.

Step 1: How to find the MAC address of a Samsung Galaxy S3

Step 1: Access the Samsung Galaxy Main Options Screen by Swiping Down from the Top of the Screen | Press the Settings Icon (Cog Wheel)

Step 2: Select About device

On the Samsung Settings screen, swipe the screen down to view the very last option at the bottom of the list.

Select About device.

Step 2: How to find the MAC address of a Samsung Galaxy S3

Step 2: Scroll to the Last Option at the Bottom of the Settings Screen and Select About device

Step 3: Select Status – Show status of battery, network, and other information

On the About device screen, select the Status option.

Step 3: How to find the MAC address of a Samsung Galaxy S3

Step 3: Select the Status Option in the About device Screen

Step 4: Find the Wi-Fi MAC Address of your Samsung Device

Swipe the screen down to find the MAC address of your Samsung Android device.

The MAC address of your mobile device can be found approximately halfway down the list under the heading of Wi-Fi MAC address.

Step 4: How to find the MAC address of a Samsung Galaxy S3

Step 4: Scroll Through the List to Locate Wi-Fi MAC address. This is the MAC Address of Your Samsung Android Device.

Click the appropriate page back button on your device until all the setting screens disappear.

Recover Hidden Files Gallery Lock

Recover Hidden Files Gallery Lock

How to recover hidden files from Gallery Lock Pro (Android) | Gallery Lock Pro vulnerability | Gallery Lock Pro License Validation Error | Gallery Lock Pro forgotten password

There are plenty of reviews about Gallery Lock Pro for Android devices. They all say pretty much the same thing and it’s held in high regard. Yet they all fail to point out that this app is not fully secure. The files you have hidden away and password protected can be recovered easily from that virtual safe. A fact that I only discovered recently, when my copy began to crash and I reinstalled the app.

The following method demonstrates this vulnerability. It is also useful to recover Gallery Lock hidden files under these circumstances:

  • Forgotten password for Gallery Lock
  • Accidental uninstall of Gallery Lock
  • Gallery Lock crashes – Gallery Lock app won’t start
  • Gallery Lock License Validation error problems – app terminates

How To Recover Hidden Files With Gallery Lock Pro

In your Android settings, select Applications Manager.

Select Applications Manager in your Android Device Settings

Select Applications Manager in your Android Device Settings

Scroll through your list of installed apps and select Gallery Lock.

Select Gallery Lock

Select Gallery Lock

Click Uninstall and wait for the application to be uninstalled.

Gallery Lock - Uninstall

Gallery Lock – Uninstall

Now, re-install the Gallery Lock application. Once installed, open the app.

Note: The act of re-installation resets the password to the default: 7777

Enter the Default Password: 7777

Enter the Default Password: 7777

Enter the default password and you will be shown a new, empty, hidden vault.

Gallery Lock's Hidden Vault

Gallery Lock’s Hidden Vault

At the bottom of the screen, click Settings.

Gallery Lock: Settings

Gallery Lock: Settings

Then click Advanced settings.

Advanced Settings:

Advanced Settings: Search and Recover Lost Files

Then, click Search and Recover lost files.

Gallery Lock will then scan your device and search for previously hidden files. This may take some time, especially if you had a lot of files hidden away. When the search is complete, Gallery Lock will inform you of how many files it has found that can be recovered. You will be asked if you wish to recover those files. Select Yes.

Gallery Lock will proceed to recover those hidden files, placing them in the following folder on your SD card:

\DCIM\recover

Once recovered, those files can be viewed from that folder in the normal way.

Now how secure was that?

Why bother with a password?

If you are seeking true encryption, then check out the EDS Lite app on Google Play.

It uses the same encryption methods employed by the TrueCrypt software for Windows and Linux. You can learn about the benefits of this technique there.

EDS Lite does not have the same, intuitive interface that Gallery Lock has. But it will lock away your files securely. Very securely.

J1nx Linux XBMC Firmware on a G-Box Midnight

XBMC Linux on a GBOX Midnight – J1nx or Static?

The G-BOX Midnight has received a mixed reception in terms of it’s advertized capabilities and its ability to run XBMC on an Android platform with acceptable performance. Certainly, the purported output of 1080p is a moot point. And every version of Android XBMC that I tried  had one problem or another; mainly audio out of sync with video, and choppy playback of HD content. Thank goodness for the Linux XBMC versions then, courtesy of static and J1nx.

Flashing the G-BOX Midnight with any flavor of Linux XBMC negates the Android operating system-bloat and allows the device to boot straight into XBMC. And for me, this is a real benefit. With the supplied remote, it’s near-on impossible to  navigate the Android Home screen with any sort of speed and dexterity. Trying to find the  XBMC icon and then click on it is a major undertaking.

I have tried the static and J1nx versions of Linux XBMC on the G-BOX Midnight v2.2 and this is what I found:

static XBMC Linux v0.2 beta

  • Very good playback of HD content. Fluid playback. No dropped frames.
  • Menus very responsive.
  • Remote fully programmed.
  • CPU usage relatively low (compared with Android versions).
  • Audio sync issues – audio out of sync with video by 125ms (average).
  • WakeOnLan add-on did not work.

J1nx XBMC Linux beta2

  • Excellent playback of SD and HD content. Playback is smooth. No dropped frames.
  • Menus very responsive.
  • Remote fully programmed.
  • CPU usage relatively low (compared with Android versions).
  • Every add-on I’ve installed works.
  • It rarely goes wrong. It’s extremely reliable.
  • Everything works as it should! This is the version I’ve kept.

My Installation

I bought the G-BOX Midnight to fuel a wall-mounted TV I put in my kitchen. An aerial connection to the TV would have resulted in unsightly wires running up the wall. Plus, I wanted the G-BOX to supply everything to the TV; live tv, recorded tv from my MediaPortal server, and everything else that XBMC can supply.

Mounting the TV

Fitting the TV Bracket Wall Anchors

Fitting the TV Bracket Wall Anchors

TV Mounted on the Wall

TV Mounted on the Wall

G-BOX Midnight Attached

G-BOX Midnight Attached and Running XBMC – TV Catchup

As shown above, I have the G-Box Midnight connected to the internet via a Home Plug and Ethernet connection, normally all tucked away behind the TV. I’ve not tried it’s performance with a wireless connection.

It plays HD video content across my home network flawlessly; both 720p and 1080p encoded files. It plays live TV too via the TV catchup add-on. And with J1nx’s version of XBMC, sound is perfectly in sync with video. A problem that was really annoying me with the Android versions.

This is good little, unobtrusive, low-powered unit that delivers the goods now that I’ve found the right firmware to suit me.

A Quick Demonstration of J1nx XBMC Linux beta2

This video depicts the boot time of my G-BOX Midnight v2.2 running the J1nx Linux beta2 firmware. It takes approximately 1min 15 seconds for XBMC to be ready and responsive.

And because of this, I leave the G-BOX switched on at all times so it’s available for immediate use when the TV is switched on. The difference in power consumption between the off and on states is negligible – unless you unplug the transformer when you’re not using it.

The first demonstration is  the playback quality of a 720p HD video, streamed over my LAN. There are no dropped frames and playback is fluid.

The second demonstration is Shoutcast radio.

And to finish off, BBC 1 via TV Catchup. Near-live TV without an aerial.

Runtastic Pro v4.1 Android Running App – Review

Runtastic Pro v4.1 Android Running App – Review

A while ago, I slated the majority of free running android apps because they failed to cater for my disability: I’m long-sighted and need reading glasses to start the majority of running apps, which is a real nuisance since I don’t need glasses for running. Not only that, my other gripes were lack of lock screens that should be there to prevent logging being stopped by accident, and the inccuracy of GPS recording.

See my review here.

I tested five running apps and Runtastic’s v3.6.1 came in third. I didn’t like how nag screens were enabled by default (the screens asking if you would like to be cheered on and encouraged by your ‘friends’ as you do your run). I didn’t like the inaccuracy of the GPS and how much worse it became when using it in ‘walk’ mode. However, I did like it’s slick interface, it’s large coloured buttons (enabling me to start and stop a session without my glasses); it’s fool-proof stop button and the way it links with MyFitnessPal to upload calories burnt at the end of a session.

It’s apparent that apps are being developed and improved, almost on a daily basis – every time I switch my phone on, it notifies me there is an update for one app or another. In fact, it becomes a chore having to update everything if, like me, you have opted to be in control of your phone and update apps manually. When you want.

So with such a significant upgrade in revisions, how would Runtastic fare this time?

Review: Runtatastic Pro v4.1 Running App for Android

UPGRADING: Was flawless. The installer removed the previous version and kept my workout data. It updated the widget I had opted to have on one of my Android main screens. I did have to drag and drop a program shortcut from the apps screen to one of my main pages though. The new version loaded my previous workout sessions without problem and had kept log in information for connected accounts such as MyFitnessPal, Facebook, Twitter and Google +

STARTING A SESSION: Before I commenced my run and while I was wearing my reading glasses, I checked the settings page to see if the Live Tracking was disabled. It was but this preference could have been carried over from the previous installation where I had disabled it myself. Therefore, I’m not sure how this version is configured if you were to perform a fresh installation. My advice is: make sure it’s turned off before you do anything else.

This is how I see Runtastic's Start button

This is how I see Runtastic’s Start button

Starting the app takes you straight to the session screen and it’s better than before. The start button is huge and dominates the central part of the screen. Perfect for anyone, especially those who can’t see without optical correction!

Press that blurred green blob and the countdown to your work out session begins; 5, 4, 3…

Not enough time to affix your phone strap to your arm? Runtastic have thought of that. There are three large grey buttons on the next screen that give you a choice of another 5 seconds countdown, 15 seconds or 30 seconds. I’ve found that 15 seconds is plenty of time for me to secure the strap to my arm and make myself ready.

LOCK SCREEN: A horizontal black bar and padlock symbol replaces the start button once a session has commenced. Pressing that initiates the appearance of the large, orange-pause and red-stop buttons. Fool-proof and easy to see!

Session recording and screen locked. Touch the black bar when your session is complete.

Session recording and screen locked. Touch the black bar when your session is complete.

Pause and Stop buttons very clear and distinguishable.

Pause and Stop buttons very clear and distinguishable.

STOPPING A SESSION: Press the red button and the the session summary appears. In this screen it is possible to enter more details about your run like the type of terrain, how you feel and weather details. At this stage I do need my glasses to save my run details. But I can’t complain about that really. At a push, I know the save button is top right if they were not at hand.

Session summary.

Session summary.

GPS ACCURACY: I ran a familiar course of known distance, calculated from Google Earth.

  • The distance recorded by Runtastic was 4.35 miles
  • The distance measured on Google Earth: 4.29miles
  • Difference between the two measurements: +/- 1.4%

Very good. I’m happy with that.

Initially, I thought that the app developers had done an excellent job at quelling my OCD regarding the accuracy of the GPS by limiting the amount of zoom on the course map. In terrain (default) mode, zoom is indeed limited.

Maximum zoom level.

Maximum zoom level in terrain (default) mode.

I can no longer zoom to street levels to see if it has logged me running through houses, crossing lakes and wandering aimlessly from one side of the road to another. And maybe that’s a good thing. After all, the overall distance run was logged with as much precision as can be expected when you consider the errors associated with the global positioning system.

I later discovered though that it is possible to zoom in further by selecting the satellite overlay on the map. And guess what? The GPS accuracy actually seems better than the previous version. A big improvement. I’d say it’s now comparable with the map my fitness suite of programs; the accuracy of which I held in high regard in my last review.

SUMMARY

  • Runtastic Pro v4.1 has a slick interface and is easy to use. It caters for my poor eye-sight when starting and stopping a session.
  • The screen locks to prevent accidental stoppage of the session log. This is essential if you carry your Android device in a strap on  your arm or waist. Why? See my previous review here.
  • Distance measured by GPS was comparable to that measured on Google Earth and acceptable with a difference of only 1.4%.
  • The accuracy of GPS at street level is much improved in this version. It’s now comparable with the competition.
  • Seems to be a very good product. It moves to pole position for me. Recommended.

A Review of Free Android Running Apps by a Long-Sighted Runner

A Review of Free Android Running Apps by a Long-Sighted Runner

UPDATE: The updated Runtastic Pro v4.1 moves into pole position for me. See my review here.

I’m 46 years old and my eyes are decrepit.

Like many people in my age group, my eyes have deteriorated to the extent that I need reading glasses.

And it’s bloody annoying.

My eye sight is great at long distance so I don’t wear my glasses for running.

So starting a running app on my Android phone is particularly difficult because everything looks like this without optical correction.

blurred01

Warmed up and eager to start a run, I often have to return to the house to find my glasses because I can’t see which button I need to press to start the app recording. With a little more thought from the app designers, the use of large coloured buttons would help invalids such as myself. Intuitive colours; green to start and red to stop for example.

The blurred example shown here is Runtastic’s launch screen. The long, green button at the bottom of the screen is the obvious button to press to start the logging process. Yet it doesn’t start logging. I’m confronted with a question.

blurred02

I’m being asked if I would like my run to be tracked live so that my friends can cheer me on and motivate me to go further. I have to go into the house to get my glasses to determine where the ‘No’ button is.

I don’t have any friends.

And by now I’m pissed off.

Pressing ‘No’ starts the countdown to the start of my run: 5… 4… 3…

yet I have to return to the house to put my glasses away. Invariably, I lose at least 40 seconds of the logged running-time because of this infuriating nag screen.

This option can actually be turned off in settings but it’s not immediately obvious and it is enabled by default. I got caught out a few times with this before I started scrolling through the settings to switch the bugger off.

I just want to run. I don’t want to start circumventing problems.

This was the catalyst; the ignition to fuel my search for the perfect running app for people like me who like to run but can’t see anything at close quarters.

But all I did was open a can of worms and develop more gripes about these apps.So let’s move on to complaint number 2: The ‘Stop’ button.

When I run, my Samsung Galaxy S3 is safely housed in a protective sheath, tethered to my right arm with a strap. I always have my headphones connected and I always listen to Firewind’s Apotheosis album. Loud. (Who needs to be virtually-cheered-on when there is awesome music like this in the world to motivate, encourage and compliment an enjoyable run?) Anyway, I digress.

CIMG0006

The phone itself has to face away from me by design. And therefore, I cannot see the screen. So the running-app is started by holding the phone in my hands and by pressing the appropriate button through the plastic window of the holder. Then I  fastened the strap to my arm quickly with the velcro strap. But some apps cannot cope with this procedure.

The revered Endomondo running app satisfies my first point. Look how big and green the start button is!

Screenshot_2013-08-19-16-30-21

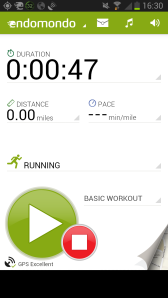
It can even be distinguished with my naked eyes.

blurred03

But this app fails big-time. The stop button is not foolproof. If you touch the red button, even for a fraction of a second, the app stops logging. Where is the slider or press and hold functionality to prevent accidental shut off?

I ran 5.6 miles to test this app and I knew something was wrong when I received no spoken interval updates. Sure enough, the app had only recorded for 29 seconds; switched off accidentally as I fixed the strap to my arm, no doubt. It’s not acceptable! It’s lazy coding and poor design from the developers. And for that reason alone it’s been uninstalled. For the life of me, I cannot see why this app is so popular. The basics aren’t right.

Now when I installed my first running app, I thought that my phone was faulty. I thought that there was a problem with my GPS because my runs were not being logged with any sort of accuracy. I’d chosen Runtastic’s running app and I wasn’t at all pleased with the tracking results.

Here is a good example of one such run; 6.4 miles in total with the majority of the distance being completed by numerous circuits of Cwmbran Boating Lake.
Here’s an overview of the course:

Screenshot_2013-08-23-17-46-27

Let’s zoom in and focus on the circuits around the lake.

Screenshot_2013-08-23-17-47-50

And a little more…

Screenshot_2013-08-23-17-48-05

I’m not Jesus. And I cannot walk on water. The GPS accuracy here is poor to say the least. In this instance, I’ve been cheated on distance and consequentially, my calculated speed and pace statistics are grossly incorrect.

I have other examples depicting me running through houses and cutting across people’s gardens. Time is the only statistic that this app can gather with any accuracy.

I have spent months tinkering with different settings on my phone in an attempt to improve GPS accuracy. I was on the verge of sending my phone back until I installed mapmywalk and realized there was nothing wrong with my hardware at all.

Look at the accuracy obtained with mapmywalk around the same course:

Screenshot_2013-08-23-17-58-44

The accuracy obtained from mapmyrun is equally as impressive and this suite of apps has become my favourite.

Reviews

So, you should be fully aware of my judging criteria by now, but just to re-cap:

  1. I want large intuitive-coloured buttons to start and stop the logging process so that there is absolutely no requirement for my reading glasses.
  2. I don’t want  nag screens to be enabled by default.
  3. Nor do I want nag screens that want me to purchase the full application.
  4. I want the stop button to be foolproof.
  5. I want the GPS to be as accurate as possible.

1. mapmyrun

A simple app to use and get acquainted with from the off.

Screenshot_2013-08-19-16-31-46

Click the orange button go to the launch page.

Screenshot_2013-08-19-16-31-57

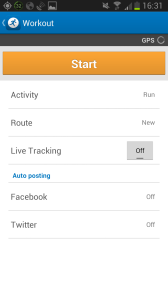
Then click start. Notice Live Tracking is off.

The only nag screen that may be shown is one that notifies you that a GPS signal has not been fixed. I’ve learned the hard way and make sure I have a GPS signal before I start the app.

Screenshot_2013-08-19-16-31-10

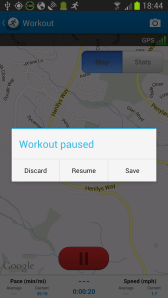
The stop button is foolproof but doesn’t actually stop the logging process. Hold and slide red button to pause the recording.

Screenshot_2013-08-23-18-44-40

And a screen I can’t read without my glasses! But I’m home now and my glasses should be at hand. Now where did I put them?

GPS is very accurate and even works well in places where I think it wouldn’t work well at all like under heavy tree cover for example.

The mapmyfitness suite of applications can do more than just record your workouts. They’re built for social networking and logging your nutrition but I use MyFitnessPal for that.

Score: 4/5 (1 point deducted for the screen I cannot read at the end of a tiring workout without my glasses.)

mapmyfitness website

2. RunKeeper

  • Pros: Large green start button. No nag screens. GPS very accurate. Able to schedule workout programmes to achieve various objectives, i.e. Sub 4 hour marathon
  • Cons: Stop button is not foolproof. Recording stops with the faintest of touches.
  • Score: 3/5 (A 2 point deduction for not having a foolproof stop button)

RunKeeper website

3. Runtastic

  • Pros: Large coloured button for starting the recording process. Foolproof stop button. Slick interface. Uploads distance and calories burnt to MyFitnessPal.
  • Cons: Nag screens enabled by default. Music player disabled in free version. GPS accuracy poor. GPS accuracy is terrible when in walk mode – it will omit large portions of your walk. Calories burnt calculation in walk mode is grossly inaccurate if you walk at speeds below 2mph (like I do when I take my boy to the park). It seems to be based on duration alone and does not take standing still into account.
  • Score: 2/5 (Would score higher if the GPS accuracy was improved)

Runtastic website

4. Endomondo

  • Pros: Large green start button.
  • Cons: Stop button not foolproof. Constant nag screens to buy the full version of the app when you’re trying to start recording.
  • Score: 1/5 (This app annoyed the hell out me. I got really frustrated trying to set it recording, ran over 5 miles and it didn’t log it!)

I uninstalled this app and never got to appraise its GPS accuracy.

Endomondo website

Other Running Apps

There are other running apps for me to evaluate like Nike+ Running and I will appraise different apps as they emerge.

Links

An excellent review of the iPod MyFitnessPal app